11 Actionable Tips on AirPods Microphone Not Working Issue
Apple’s AirPods are wireless earbuds that have quickly gained popularity, thanks to their small size, wireless capabilities, and high quality.
Even these most advanced Bluetooth headphones can sometimes fail, resulting in the AirPods microphone not working.
Do you find it difficult to utilize your AirPods’ microphones at all times?
Dirt in the microphone holes, incorrectly adjusted settings, and minor flaws or malfunctions can all cause it to stop working normally.
The solutions mentioned here should assist you in resolving any microphone issues with Apple’s wireless earbuds, whether your conversation sounds distorted or your AirPods do not pick up your voice.
1. Reconnect AirPods
Most audio problems with your AirPods may be addressed by reconnecting them to your Apple device, especially if they functioned fine just a minute before.
Simply put both earbuds back into their charging case (or Smart Case if you’re using the AirPods Max) and take them out.
Then check to see whether they are operational.
2. Getting Rid of Dirt
If you’ve been using your AirPods for a long time, the microphone openings may have been clogged with dust.
This dust accumulation may block voice reception into the AirPod mic. Attempt to get rid of them.
The microphones are situated at the tip of the AirPods’ stems.
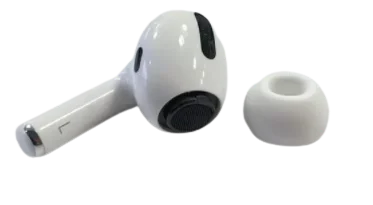
Spray a cotton swab with rubbing alcohol and wipe it over the microphone holes and the bottom of the AirPods to remove any gunk.
Then, with a toothpick or tweezers, remove the particles from the microphone hole.
While doing this, take special care not to damage the mesh grill that covers the microphones.
Once you’ve finished cleaning the AirPods, reconnect and test the microphone again.
3. Examine Your AirPods for Water Damage
The AirPods are resistant to water and perspiration but are neither waterproof nor sweatproof.
AirPods should never be submerged, swum with, worn in a sauna or steam room, or brought into the shower.
Because if liquid gets into your AirPods, you’ll most likely hear muffled or no audio. If your AirPods become wet, clean them with a gentle, dry, lint-free cloth.
You should never use heat or compressed air to dry your AirPods, according to Apple’s support documentation.
4.AirPods Need to Be Charged
The simplest repairs are sometimes the best.
If your AirPods mic isn’t working, it might be because they don’t have enough battery power.
Check the charge in your AirPods case by holding it near your iPhone before proceeding.
If the battery is low, the microphone’s operation may be hampered. Charge your AirPods to check if the microphone issue has been corrected.
5. Firmware Update for AirPods
AirPods with out-of-date firmware may not function correctly.
Go to Settings > General > About > AirPods to check your current Firmware Version.
If you see an out-of-date version number, try updating the firmware (the AirPods Wikipedia page is a great location to look for the most recent version).
Connect your AirPods to a charging source and keep them close to your iPhone, which should be connected to the internet.
If you return in 30 minutes, they should have already been updated.
6. Reboot Your Apple Device
If your AirPods microphone isn’t working properly, simply restart the device to which you’re attempting to connect them.
Consider restarting your iPhone to resolve occasional connectivity issues that prevent it from accurately detecting the input audio from your AirPods.
To begin, hold down the Volume Down and Side buttons for a few seconds (or just hold the Side button on iPhones with a Home button).
Then, to turn the gadget off, slide the Power symbol to the right. Wait 30 seconds before pushing the button again to restart.
7. Ensure That Your Bluetooth Connection Is Stable
In most situations, a poor Bluetooth connection stops voice signals from the AirPod’s microphone from reaching the iPhone.
Because this is the sole means for your AirPods to communicate with your smartphone, it must work correctly.
If it isn’t, it’s most likely due to Bluetooth interference, particularly if other Bluetooth devices are nearby. It is important to determine what is causing Bluetooth interference and how to resolve it.
Many of us in today’s high-tech world are likely to be using many Bluetooth devices at the same time, such as printers, speakers, keyboards, or even other wireless headphones. Check that these devices are turned off or disconnected.
Bluetooth is a wireless radio band that, like Wi-Fi, can have connectivity problems. Restarting your Bluetooth connection on your iPhone, iPad, or Mac may resolve the issue.
8. Turn Off Noise Cancelation
Any excellent noise cancellation relies on clean microphone audio. Some people disable this option as one way to improve the sound quality of their AirPods.
Open the Control Center while wearing the AirPods and long-press the Volume slider until the extra controls show.
Then, in the lower-left corner, press the Noise Control icon and toggle it to Off.
9. Make Sure the Active Microphone Settings Are Correct
If you can only use the microphone on one AirPod, your settings may be causing the mic’s failure.
Check the active microphone configuration of your AirPods to verify if it is set to use both microphones.
In Bluetooth Settings, tap the Info icon next to your AirPods.
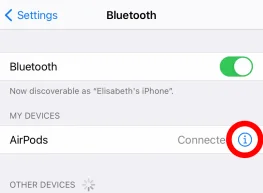
Then, on the Microphone screen, enable the Automatically Switch AirPods option to allow your AirPods to select the optimal microphone for the circumstance while you’re on the go.
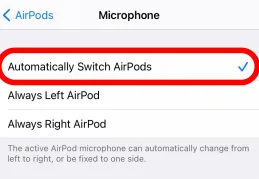
In the other two selections, just the microphone on your left or right AirPod will be used.
If you put the wrong earbud in the charging case, or if there is too much ambient noise coming from the same direction as the active microphone, this might cause issues.
10. Reset Your AirPods
Have you had any luck thus far?
If required, reset your AirPods. First, place them in their charging case or Smart Case.
Then, press and hold the Status button on the charging case until the status light becomes amber (or both the Noise Control button and the Digital Crown on the AirPods Max).
That’s all there is to it—they’ve been reset.
Open the charging case next to your iPhone (or take your AirPods Max out of their Smart Case) and select Connect > Done.
11. Replace Your AirPods or Repair Them
If none of the previous options worked, you’re most likely dealing with a defective set of AirPods.
If you often drop your AirPods, the microphones may have been damaged.
Even though they can withstand a lot of abuse, AirPods remain a sensitive piece of technology. Wear and tear, such as dropping them, might have an adverse effect.
Contact Apple Support or make an appointment for your AirPods to be repaired or replaced at an Apple Store near you.
See Apple’s AirPods Service & Repair page for further information.
Related: Why Does the Mic Keep Cutting Out in Windows 10? [Simple Fixes]
Conclusion
Hopefully, the methods provided above helped fix any difficulties you were experiencing with your AirPods’ microphone not working.
By following these suggestions, you can help safeguard the operation of your AirPods’ microphone and enjoy uninterrupted audio experiences.
Finally, having microphone problems with your AirPods might be an unpleasant experience. However, equipped with the troubleshooting procedures explained in this article, you may efficiently handle many common difficulties.
There are measures you can take to restore your AirPods microphone functioning, whether it’s due to a software setup, a hardware issue, or just a need for cleaning.
If you require more assistance, please contact Apple Support or visit an authorized service center.
By following the advice suggested and taking good care of your AirPods, you may avoid future microphone difficulties and continue to enjoy the wireless convenience they bring.
We hope you found this solution useful, and do like and follow us on Facebook and Twitter to receive frequent updates.
Frequently Asked Questions
Why Can’t Callers Hear Me On My AirPods?
If callers can’t hear you over your AirPods, the mics are probably filthy and need to be cleaned.
Why is my AirPods microphone not working?
A non-functional AirPods microphone can be caused by several factors. It might be due to software settings, hardware difficulties, or even dirt and debris obscuring the microphone. This article includes troubleshooting procedures to help identify and address the exact source of the problem.
Can I fix the AirPods microphone issues myself?
Yes, by following the troubleshooting procedures provided in this post, you can resolve many AirPods microphone difficulties. We give extensive steps to help you repair the problem on your own, from checking settings and updates to cleaning and analyzing the hardware. However, if the problem persists or you are uncomfortable troubleshooting, it is best to get expert help.
How can I prevent future microphone issues with my AirPods?
Preventing microphone difficulties with your AirPods is critical. We recommend cleaning your AirPods regularly, keeping them away from any physical harm, and keeping your firmware and software up to date. By integrating these measures into your routine, you can reduce the likelihood of future microphone issues.
Furthermore, we request that you bookmark this page for future reference.
Sign up for our free newsletter as well to receive new information directly in your email and stay informed technically.


