
How to Convert CD to MP3: 3 Easy Methods
Converting CDs to MP3 format is becoming increasingly popular among music fans who prefer the mobility and convenience of digital audio files.
By digitizing your CD collection, you can listen to your favorite music on various platforms, including smartphones, tablets, and laptop computers.
This article will take you step-by-step through converting CDs to MP3 files.
From acquiring the necessary tools to maintaining and organizing your digital music library, we will provide step-by-step instructions and advice to ensure a smooth and joyful conversion experience.
So, let’s get started and learn how to convert a CD to MP3!
1. Introduction to CD to MP3 Conversion
Why Convert a CD to MP3?
Have you ever considered converting your favorite CD collection to a more portable and adaptable digital format?
There is no need to look any further! Converting CD to MP3 is a game-changer because it allows you to listen to your music on multiple devices, create personalized playlists, and save valuable physical storage space.
So, goodbye, big CDs, and hello, digital music!
2. Gathering Necessary Tools and Software
Required Hardware for CD Ripping
To begin this audio conversion process, you’ll need a few things.
To get started, you’ll need a good computer with a CD drive. So get out that old laptop or PC and see if it’s up to the task.
Don’t be concerned if your new computer lacks a CD drive. External CD drives are readily available to complete your ripping task.
Choosing the Right Software
To convert CDs to MP3, you’ll need the right CD to MP3 converter software. There are several free and paid solutions available.
“iTunes” is a popular choice for Mac users, whereas “Windows Media Player” works flawlessly for Windows users.
Don’t be afraid to investigate third-party software solutions, such as VLC media players, as they frequently provide more functionality and flexibility.
3. Step-by-Step Guide for CD Ripping
Preparing the CD and Computer
Make sure your CD is clean and free of scratches before starting the ripping process. We understand how inconvenient skipping or distorted tracks can be.
To ensure a smooth and continuous ripping experience, close any resource-hogging programs on your computer.
Setting Up CD Ripping Software
After you’ve installed your chosen program, launch it and look for the CD. Most applications will automatically recognize the CD and display its contents.
If not, there should be an “Import” or “Rip” button to begin the process.
Configuring Audio Extraction Settings
Before pressing the “Rip” button, take the time to customize your audio extraction parameters in the software.
Choose the appropriate output format, in this case, MP3. You may be able to alter the audio quality or bitrate as well.
Keep in mind that higher bitrates provide better sound quality but necessitate more storage space.
Initiating the CD Ripping Process
It’s now time to hit the magical button and let the program do its job.
The ripping process may take a few minutes, depending on the speed of your computer and the number of tracks on the CD.
Get in and wait for the program to start working.
4. Choosing the Right Audio Format and Bitrate
Understanding Different Audio Formats
When it comes to audio formats, MP3 is the most popular and widely used. However, depending on your preferences and device compatibility, you can also choose from other formats such as AAC, FLAC, or WAV.
Just keep in mind that while some formats provide better sound quality, they may require more storage space.
Factors to Consider When Selecting Bitrate
Let us now look at bitrates. The bitrate refers to the amount of data used to encode each second of audio.
A higher bitrate results in better audio quality but larger file sizes. Keep your storage space and desired audio quality in mind when deciding on a bitrate.
For most casual listeners, a bitrate of 192 kbps or 256 kbps provides a good balance of quality and file size.
With the right tools, software, and a little patience, you can convert your CD collection to MP3 and enter a whole new world of music enjoyment.
In this post, we will demonstrate three simple and effective methods for converting CD audio tracks to MP3 on a PC, allowing you to easily rip music from CDs.
5. How to Convert CD Audio Tracks to MP3
How to Convert CD Audio Tracks to MP3 with Windows Media Player
You can use the built-in program, Windows Media Player, to convert a CD to MP3 files on a PC without using any additional software.
It can burn audio files to a CD and rip audio from a CD, in addition to being a media player. When transferring songs from a CD to your computer, Windows Media Player supports the MP3, WMA, WAV, FLAC, and ALAC formats.
Regardless of the output format, which is frequently MP3 or lossless FLAC, Windows Media Player is enough.
If you want to rip a CD to MP3, you must change the settings so that the ripped music is saved in that format.
The steps for fine-tuning the settings are as follows:
Step 1: Launch Windows Media Player.
Step 2: From the menu bar, click “Organize” and then “Options.”
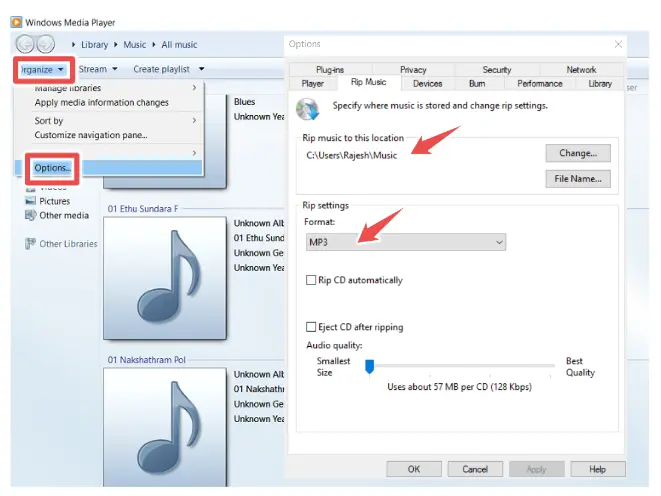
Step 3: Select “MP3” in the Rip Settings section of the “Rip Music” tab.
Step 4: The ripped tracks will be saved in the “Music” folder by default.
To change the location, click “Change” and navigate to the desired folder.
To rip music from a CD to an MP3,
Step 1: Insert the CD into your computer’s CD drive.
Step 2: Open Windows Media Player and select “Rip CD.”
Step 3: Once the ripping procedure is complete, navigate to the specified folder to inspect the MP3 files.
How to Convert CD Audio Tracks to MP3 with VLC Media Player
VLC is a cross-platform media player that can convert CD audio recordings to MP3. I
f you’re unhappy with Windows Media Player, you can try VLC. Install the VLC media player on your computer, then proceed with the steps below to convert a CD to MP3.
To rip a CD to MP3, follow these steps:
Step 1: Insert the CD into your computer’s CD drive.
Step 2: Open VLC Media Player and navigate to “Media” > “Convert/Save.”

Step 3: Go to the “Disc” tab and choose “Audio CD.”
Step 4: Click “Browse” and choose the CD to rip.
Step 5: Choose a starting point and click “Convert/Save.”
Step 6: In the new window, navigate to “Profile” and click the tool icon. You may configure the audio codec and other parameters here. When you’re finished, click “Save.”
Step 7: In the Convert window, click “Start” to begin ripping audio from the CD to your computer.
How to Convert CD Audio Tracks to MP3 with iTunes
iTunes can also be used to convert CD songs to MP3. We’re all familiar with iTunes, Apple’s PC media player that assists
Apple users in managing their media sources. It is primarily used to play music and videos and to sync data between PC and iOS devices.
Follow the steps below to learn how to rip an audio CD to MP3 using iTunes.
Step 1: Insert your CD into your computer.
Step 2: Launch iTunes and navigate to the CD page by clicking the CD icon on the interface.
Step 3: Click “Import CD,” and a pop-up window titled “Import Settings” will appear. Choose “MP3 Encoder” for the “Import Using” setting and make your audio quality decision in “Settings.” This ensures that the CD is exported in MP3 format and at the specified quality.
Step 4: Click “OK” to begin importing the CD to iTunes. There will be a window where you can uncheck the tracks you do not want to extract from the CD. When the procedure is finished, navigate to the iTunes Library and locate the exported CD audio files.
Step 4: Right-click any imported music and select “Show in Windows Explorer” to locate it on your computer file explorer.
6. Organizing and Managing MP3 Files
Creating a Folder Structure
When converting your CD collection to MP3, it’s critical to have a well-organized folder structure. Create primary folders for each genre or category, such as “Rock,” “Pop,” or “Classical.”
You can further categorize your files by artist or album name under each genre category. Finding the right music track will be as simple as finding any other file on your computer.
Naming Conventions for MP3 Files
To avoid misunderstandings, it’s a good idea to create naming criteria for your MP3 files.
Maintain consistency by including important details such as the artist’s name, album title, and track number. In other words, it can be in the form of “Artist – Album – 01 – Song Title.mp3.”
This makes your music library appear professional and organized, and it eliminates the need to guess when looking for a specific track.
Tagging MP3 Files with Metadata
Metadata acts as an identification badge for your MP3 files. It includes details like the artist’s name, album title, track listing, and even album artwork.
Spend time labeling your MP3 files with accurate and detailed information to make your music collection stand out.
Using software such as iTunes or specialist tagging solutions, you can easily add that extra boost to your music collection.
7. Transferring MP3 Files to Various Devices
Syncing with Desktop and Laptop Computers
After you’ve sorted and tagged your MP3 songs, it’s time to transfer them to your desired location on the same or a different desktop or laptop computer.
Connect your device with a USB cable or use a file-sharing service like Dropbox or Google Drive. Syncing your MP3s to your computer allows you to listen to your music collection whenever you want without having to worry about losing your valuable CDs.
Transferring to Mobile Devices
Connect your mobile device to your computer and sync the MP3 files using software such as iTunes or Windows Media Player.
You can also save your MP3s on a memory card or transfer them using file-sharing tools like AirDrop or Bluetooth.
You can now listen to music while walking, running, or doing other activities.
Uploading to Cloud Storage or Music Streaming Services
If you enjoy cloud storage or music streaming services, you’re in luck. Many platforms allow you to upload MP3 songs to the cloud instantly or connect your collection to their music streaming service.
You can listen to your music on multiple devices without having to carry around a stack of CDs. It’s like having your entire music collection in your pocket!
8. Troubleshooting and Tips for Smooth Conversion
Dealing with Error Messages
During the conversion process, you may see error messages.
Don’t be concerned! Examine your CD for scratches and dirt. Clean the CD thoroughly with a soft cloth, and if the problem persists, try a different CD-ripping software or, if necessary, change the settings.
You can solve the problem if you don’t give up on the ripping process.
Improving CD Ripping Quality
Choose a higher bit rate for your files when converting your CD to MP3 to ensure the best quality.
The higher the bit rate, the better the audio quality. However, remember that higher bit rates result in larger file sizes.
So, when it comes to your music collection, find the right balance of quality and storage space.
Common Issues and Solutions
As with any other task, snags are to be expected during the conversion process. Manually correcting missing album artwork or incorrect track listings is possible by modifying the metadata of your MP3 files.
If you’re having playback issues, make sure your music player software is up-to-date, or try a different player entirely. Don’t let these annoying issues derail your fantastic music conversion process.
9. Conclusion: Enjoying Your Music in MP3 Format
By converting your CDs to MP3, you are embracing the digital era and removing physical disk clutter.
By following the instructions in this article, you can quickly convert your CD collection into digital MP3 files that can be played on multiple devices. With an organized music collection, appropriately titled files, and tagged information, your favorite songs are just a few clicks away.
Your music is always available, whether you’re syncing it to your PC, uploading it to your mobile device, or listening to it on cloud storage or streaming services.
So, get started today and realize the true value of your music collection in the digital age.
Please share this article with your friends and relatives if you find it useful.
We also ask that you bookmark this page for future reference, as we are constantly updating our articles with new information.
Sign up for our free newsletter as well to receive fresh information immediately in your inbox and keep technically up to date.