How to Convert CDA to MP3: The Ultimate Guide
Quick answer: A CDA file isn’t actually an audio file. It’s a tiny shortcut Windows creates for each track on an audio CD, with no real audio data inside it. You can’t “convert” a CDA file directly; instead, you need to rip the CD using software like Windows Media Player, iTunes/Music (Mac), or a dedicated ripper, which reads the real audio off the disc and saves it as a genuine MP3 file.
If you’ve ever tried to copy a .cda file from a CD to your desktop and then double-click it, only to get an error or a file that won’t play anywhere else, you’ve run into one of the most common and most misunderstood quirks of digital audio.
This guide clears up exactly what’s going on, then walks through the fastest, most reliable ways to turn those old audio CDs into MP3 files you can actually use on any device.
Note: This guide focuses specifically on the common confusion surrounding CDA files. If you’re looking for a complete step-by-step tutorial on ripping audio CDs, check out our detailed guide on How to Convert a CD to MP3. It covers the entire process, from choosing the right settings to creating high-quality digital audio files.
What Is a CDA File, Really?
CDA stands for “CD Audio,” and despite the file extension, it isn’t an audio format at all. It’s a small shortcut (usually just 44 bytes) that Windows automatically generates for each track when you insert an audio CD.
That tiny file only records where a track starts and stops on the disc; the actual sound data lives on the CD itself, encoded in the Red Book audio standard (16-bit, 44.1kHz PCM).
That’s why a CDA file plays fine while the disc is in the drive, but does nothing, or throws an error, the moment you copy it anywhere else. There’s nothing to play; the shortcut has lost the disc it was pointing to.
Why You Can’t Just “Convert” a CDA File
Because a CDA file holds no actual audio, there’s technically nothing inside it to convert. What you’re really doing when you “convert CDA to MP3” is ripping: reading the raw audio directly off the CD while it’s still in the drive, then compressing and saving that audio as a genuine MP3 file.
Any guide, tool, or converter that claims to “convert” a copied CDA file without the original disc present is either describing this same ripping process loosely or won’t actually work.
What You’ll Need Before You Start
- A computer with a CD drive (internal or external; see the dedicated section below if yours doesn’t have one)
- The original audio CD
- Free disk space (a full CD ripped at a high bitrate typically takes up 60–100MB)
- Software to do the ripping: Windows Media Player or Music/iTunes are both already free and, in most cases, already installed
Related: How to Convert CDs to Digital Files? Easy Ways to Rip a CD
Method 1: Rip CDA to MP3 with Windows Media Player
Windows Media Player comes pre-installed on Windows and is the simplest free option for most PC users.
Step 1: Insert your audio CD into your computer’s CD drive.
Step 2: Open Windows Media Player.
Step 3: Go to Organize > Options, then open the Rip Music tab.
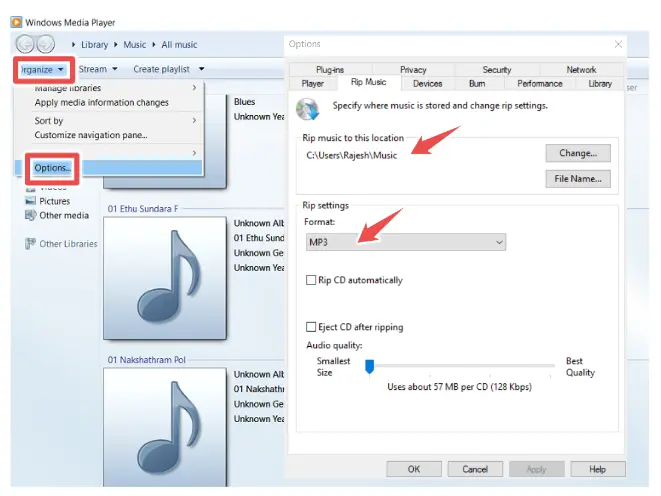
Step 4: Under “Rip music to this location,” choose where you want your MP3 files saved.
Step 5: Under “Format,” select MP3.
Step 6: Set your preferred audio quality/bitrate using the slider (see the bitrate section below for guidance).
Step 7: Click OK, then click Rip CD in the main Windows Media Player window.
Step 8: Wait for the progress indicators next to each track to complete, then close Windows Media Player and eject the disc once finished.
Windows Media Player also has an option under the same Rip Music settings to enable error correction. Turning this on is worth doing for older or slightly scratched discs, since it slows the rip down slightly but reduces audio glitches in the output.
Method 2: Rip CDA to MP3 on Mac with the Music App
Mac computers don’t use CDA files the same way Windows does, but the underlying task, extracting real audio from a physical CD, works almost identically through Apple’s Music app (or iTunes on older macOS versions).
Step 1: Insert the audio CD into your Mac’s CD drive (internal or external).
Step 2: Open the Music app (or iTunes).
Step 3: Go to Music > Settings (or Edit > Preferences in iTunes), then click the Files tab and choose Import Settings.
Step 4: Set “Import Using” to MP3 Encoder, and choose your preferred quality setting.
Step 5: Click OK, then close the settings window.
Step 6: When the CD appears in the sidebar, click it, then select the tracks you want to import (all are selected by default).
Step 7: Click Import CD. A progress indicator will appear next to each track as it’s ripped.
Step 8: Once finished, your MP3 files will be in your Music library, and you can locate the actual files through File > Library > Show Library Files if you want to move them elsewhere.
Method 3: Use a Dedicated Audio Converter
If you’re digitizing a large CD collection, want finer control over quality, or Windows Media Player/Music keeps mishandling a particular disc, dedicated ripping software is worth the switch.
Strong options include:
- Exact Audio Copy (Windows, free): the gold standard for audiophiles; it re-reads damaged or scratched sections multiple times to produce the most accurate possible rip.
- fre:ac (Windows/Mac/Linux, free): an open-source ripper and converter with batch processing and solid metadata (ID3 tag) handling.
- AVS Audio Converter / Wondershare UniConverter (Windows/Mac, paid with free trial): polished interfaces with built-in editing tools like trimming and bitrate fine-tuning.
The general workflow is similar across all of them: insert the disc, let the software detect the tracks, choose MP3 as your output format and set a bitrate, then start the rip.
Method 4: Convert CDA to MP3 Online
Online tools like Convertio can process CD audio (sometimes listed as “CDDA”) without installing anything, but you’ll need to have already extracted the raw audio track from the disc first.
These tools generally can’t read directly from a physical CD in your drive, and won’t do anything useful with a plain copied one .cda shortcut file.
Step 1: Rip the raw audio track to your hard drive using one of the desktop methods above (most rippers can output WAV as an intermediate format if you’re not ready to commit to a final bitrate yet).
Step 2: Go to your chosen online converter and upload the extracted audio file.
Step 3: Select MP3 as the output format and choose your bitrate.
Step 4: Click Convert, then download your finished MP3.
This route is really only useful if you’ve already got raw audio extracted and just need a quick format change. It’s not a shortcut around the ripping step itself.
No CD Drive? Here’s What to Do
This trips up more people than any single step in the ripping process itself: most laptops and many desktops sold since the mid-2010s no longer include a built-in CD/DVD drive. If that’s you, you have two straightforward options:
- Get an external USB CD/DVD drive. These connect via USB-A or USB-C, are recognized automatically on Windows and Mac without extra drivers, and cost relatively little. A portable external CD drive like the Rioddas External CD/DVD Drive (view on Amazon) is the simplest long-term fix if you’re planning to digitize more than a disc or two. Every method in this guide works the same way once it’s plugged in.
- Borrow access to a drive elsewhere. A friend’s older computer, for instance, rips your CDs there and transfers the resulting MP3 files to your main device via USB drive or cloud storage.
Choosing the Right Bitrate
Bitrate determines the balance between audio quality and file size. A higher bitrate usually produces clearer, more detailed sound. However, it also creates a larger audio file. A lower bitrate saves storage space but may reduce sound quality.
- 128 kbps – noticeably compressed; fine only if storage space is extremely tight.
- 192 kbps – a reasonable middle ground for casual, everyday listening.
- 256 kbps – very good quality for most listeners and most playback devices.
- 320 kbps – the maximum standard MP3 bitrate, and the best choice if you’re archiving a CD you may not be able to re-rip later, or if you’re an attentive listener using good headphones or speakers.
If you’re ripping a CD for long-term storage, choose 320 kbps whenever possible. The files will be larger, but you’ll preserve more audio detail. Storage space is inexpensive today, so the extra size is rarely a problem. If the original CD is later lost, scratched, or damaged, you may not get another chance to create a high-quality digital copy.
Related: Easy Ways to Convert M4A to WAV (Free and Paid Methods)
Comparing Your Options
| Method | Cost | Best For | Limitations |
|---|---|---|---|
| Windows Media Player | Free (built into Windows) | Most Windows users, straightforward rips | Fewer quality/error-correction controls than dedicated rippers |
| Music app / iTunes (Mac) | Free (built into macOS) | Mac users, especially those already using Apple Music | Same core process; not ideal for very large batch jobs |
| Exact Audio Copy / fre:ac | Free | Damaged, scratched, or old discs; audiophile-grade accuracy | Steeper learning curve for beginners |
| Paid dedicated converters (AVS, UniConverter) | Free trial / paid | Large collections, extra editing features | License cost for full functionality |
| Online converters | Free (limited) / paid | Converting audio you’ve already extracted | Can’t read directly from a physical disc |
Common Mistakes to Avoid
- Copying the
.cdafile and expecting it to play elsewhere. It never will. There’s no audio inside it. You have to rip, not copy. - Ripping at a low bitrate, you can’t undo later. If there’s any chance you’ll lose access to the original disc, rip at 320 kbps the first time.
- Skipping error correction on old or scratched discs. It takes longer, but it meaningfully reduces pops, clicks, and skips in the final MP3.
- Not checking or fixing track metadata (ID3 tags). Most ripping software pulls track/artist names automatically from an online database when connected to the internet. Double-check this before ripping a large collection so you’re not stuck manually renaming dozens of files later.
- Assuming every device can read a CD. If your computer never had a drive, or you no longer have access to one, address that first, rather than troubleshooting software that was never going to work.
Troubleshooting Common Ripping Problems
Windows Media Player or Music doesn’t detect the CD. Make sure the disc is clean and free of visible scratches, try ejecting and reinserting it, and confirm your CD drive shows up correctly in your computer’s device list.
The ripped MP3 has clicks, pops, or skips. This usually points to a scratched or dirty disc. Clean the CD gently with a soft cloth (wiping from the center outward), then re-rip with error correction enabled, or try Exact Audio Copy, which is specifically built to recover audio from damaged discs.
Track names or artist info are missing after ripping. Your ripping software needs an internet connection to pull metadata from an online CD database (like Gracenote). If you’re offline or the disc is obscure/unreleased, you may need to enter track info manually.
The rip is extremely slow. Error correction mode intentionally slows things down for accuracy. If speed matters more than perfect fidelity for a particular disc, you can turn error correction off. Just expect a slightly higher risk of audio glitches on scratched sections.
A specific track won’t rip at all. Try ripping that track in isolation, and if it repeatedly fails, the disc may have physical damage in that specific section. A specialized recovery tool like Exact Audio Copy has the best odds of successfully extracting a stubborn track.
Final Thoughts
Once you understand that a CDA file is just a pointer and not real audio, the whole “conversion” process makes a lot more sense. You’re not converting a file, you’re ripping the disc itself.
For most people, the built-in tools already on your computer (Windows Media Player or the Music app) are all you need.
Save dedicated software like Exact Audio Copy for older, scratched discs where getting a clean rip matters more than convenience, and always lean toward a higher bitrate if there’s any chance the original CD won’t be around forever.
Frequently Asked Questions
Can I convert a CDA file directly to MP3 without the original CD?
No. A CDA file has no audio data in it. It only works while the source CD is present. You need to rip the CD itself to get real MP3 files.
Is ripping a CD to MP3 legal?
In most regions, ripping a CD you personally own for your own personal use is generally accepted, though copyright laws vary by country. It’s worth checking local rules if you’re unsure, especially before sharing or distributing the files.
What software do I need to convert CDA to MP3?
Windows Media Player (Windows) or the Music app/iTunes (Mac) are both free, pre-installed options. Dedicated tools like Exact Audio Copy or fre:ac offer more control for larger or trickier collections.
Why won’t my copied CDA file play in any media player?
Because it’s just a shortcut with no audio data. This is expected behavior, not a bug or corrupted file.
What’s the best bitrate for ripping CDs to MP3?
256–320 kbps gives the best balance of quality and reasonable file size; use 320 kbps if you want the closest possible match to the original CD audio.
Can I convert CDA to MP3 on a Mac?
Yes. The Music app (or iTunes on older macOS) rips CDs to MP3 with essentially the same process as Windows Media Player.
My laptop doesn’t have a CD drive. How do I rip my CDs?
Use an external USB CD/DVD drive. They plug in via USB and are automatically recognized on both Windows and Mac.
Does ripping a CD reduce the audio quality?
MP3 is a lossy format, so there’s some quality loss compared to the original CD audio, but at 256–320 kbps, the difference is generally very hard to notice for most listeners.
Can I batch convert an entire CD to MP3 in one go?
Yes. Windows Media Player, Music/iTunes, and dedicated rippers can all process every track on a disc in a single ripping session.
What does “error correction” do when ripping a CD?
It re-reads sections of the disc that seem inconsistent, which helps prevent clicks, pops, or skips in the final MP3; especially useful for older or scratched CDs.
Why are my ripped tracks named “Track 1,” “Track 2,” etc., instead of the song names?
Your computer wasn’t connected to the internet during ripping, so it couldn’t retrieve the disc’s metadata from an online database. Reconnect and try again, or enter the details manually.
Can I rip a CD to a format other than MP3?
Yes. Most ripping software also supports WAV, AAC, FLAC, and other formats; MP3 is simply the most universally compatible choice.
Is there a free tool for ripping scratched or damaged CDs?
Exact Audio Copy is free and specifically designed to extract the best possible audio from damaged discs through repeated read attempts.
How long does it take to rip a full CD to MP3?
Typically, a few minutes for a standard album, depending on your drive speed and whether error correction is enabled.
Do I need an internet connection to rip a CD?
No, ripping itself works offline. You only need a connection if you want automatic track/artist name lookup.
Can online converters rip my CD directly?
No. Online tools can only convert audio files you’ve already extracted; they can’t read a physical CD in your drive.
What’s the difference between CDA and MP3?
CDA is a shortcut pointing to uncompressed audio on a CD; MP3 is a real, compressed audio file that plays independently on virtually any device.
Please share this article with your friends and relatives if you find it useful.
We also ask that you bookmark this page for future reference, as we are constantly updating our articles with new information.
Sign up for our free newsletter as well to receive fresh information immediately in your inbox and keep technically up to date.
Disclosure: If you follow our links to a retailer’s website and make a purchase, we will get an affiliate commission on some, but not all, of the items or services we promote. This will cause no price change for you.


