Surround Speaker Setup Guide: 5.1, 7.1 & Atmos Placement
Quick Answer: A proper surround sound setup comes down to three things. Correct speaker placement angles for your channel count, a subwoofer position chosen by ear rather than convenience, and running your receiver’s auto-calibration before you fine-tune anything manually. For most living rooms, a 5.1 system is the right starting point in such a way that front left/right are at 22–30 degrees off-center, a center channel at ear level below or above the TV, surround speakers at the sides of your seating position (110–120 degrees), and a subwoofer placed wherever the bass actually sounds tightest in your room, not wherever it’s most convenient to hide the box.
Speaker placement affects sound quality more than nearly any other single decision you’ll make. Mid-range speakers placed correctly consistently beat expensive speakers placed badly.
Understanding Surround Sound Formats: 5.1, 7.1, and Atmos
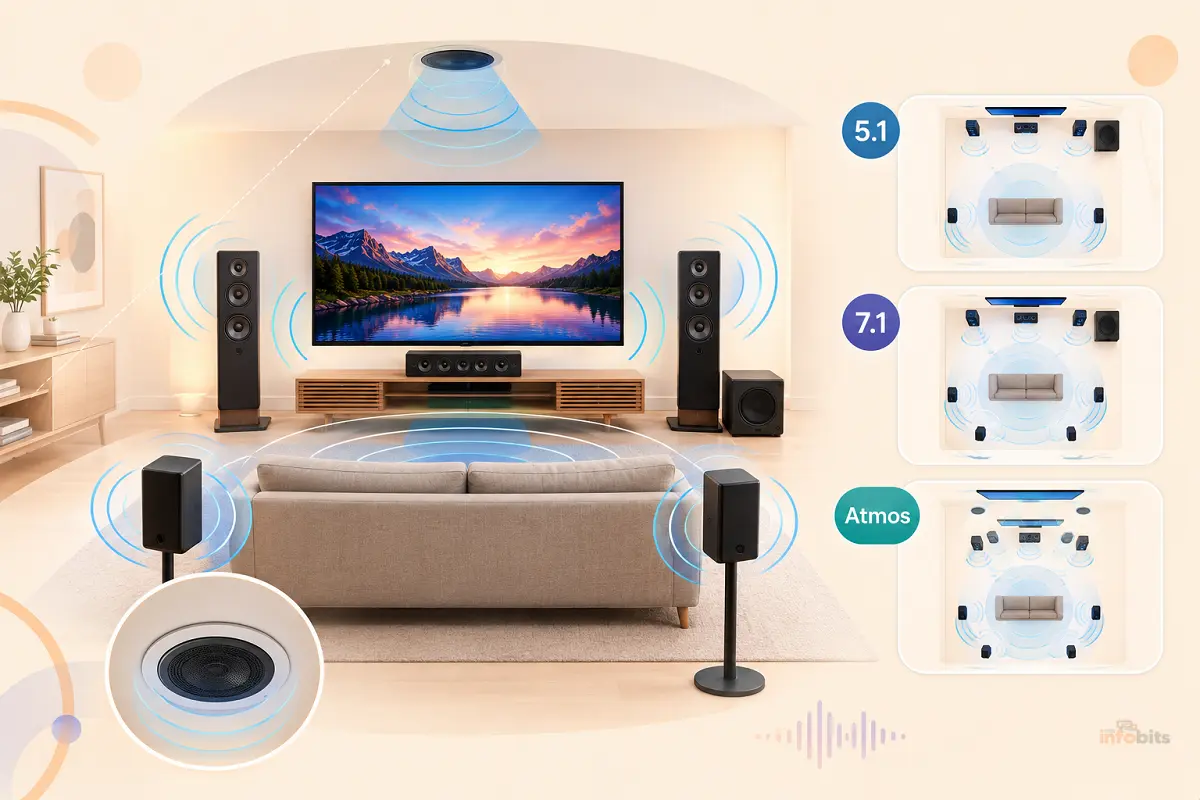
Surround sound systems are named by a number code. The first number is the count of full-range speakers, the number after the decimal is subwoofers, and (for Atmos setups) a third number represents height/overhead speakers.
| Format | Speakers | Best For |
|---|---|---|
| 5.1 | Front L/R, center, surround L/R, 1 subwoofer | The baseline for most rooms. This is what the majority of movies and shows are actually mixed for |
| 7.1 | 5.1 plus two rear surrounds | Larger or longer rooms where side surrounds alone leave a gap behind the listener |
| 5.1.2 (Atmos) | 5.1 plus two height/overhead speakers | Adds a three-dimensional layer; rain, aircraft, ambience overhead |
| 7.1.4 (Atmos) | 7.1 plus four height speakers | Full immersive setup for larger, dedicated home theater rooms |
Which one should you actually build? For most living rooms, 5.1 remains the sensible starting point. It’s what most content is mixed for, and content built for 7.1 or Atmos will still play back correctly (just without the extra channels) on a well-set-up 5.1 system.
Stepping up to 7.1 pays off specifically in larger or longer rooms where side-only surrounds leave an audible gap behind the seating position. More channels only help if your room actually has the physical space to place them correctly. Cramming rear speakers into a bad spot for the sake of the channel count is a downgrade, not an upgrade.
5.1 Speaker Placement: The Foundation
Getting a standard 5.1 layout right is the single most important step, since it’s also the base every larger system builds on.
- Front left and right: Position at roughly 22–30 degrees off-center from your main seat (Dolby recommends 22–30°; THX specifies 22.5–30°). In practice, most rooms sound best around 26–30 degrees. Angle them slightly inward, toward the listening position.
- Center channel: Place directly above or below the middle of the TV, pointed at the main seat, with the tweeter as close to ear height as your setup allows. The center channel carries the majority of dialogue, so getting this position right matters more than most people expect. An obstructed or poorly aimed center speaker is one of the most common causes of muddy, hard-to-follow dialogue.
- Surround left and right: Position to the sides of your listening position, at roughly 90–110 degrees from center (Dolby suggests 110–120°; THX is slightly tighter at 90–110°). Mount them about two feet above seated ear level, angled down toward the seating area, so the surround field wraps around you instead of firing directly at the back of your head.
- Subwoofer: Covered in detail below. Placement here matters more than for any other speaker in the system.
Stepping Up to 7.1: Where the Extra Speakers Go
A 7.1 system splits surround duty into two distinct pairs instead of asking two speakers to do everything:
- Side surrounds stay in the same 90–110-degree position as a 5.1 setup’s surrounds.
- Rear surrounds go behind the listening position, angled in at 135–150 degrees, roughly three to six feet from the main seat.
If your room is too short for genuine rear placement, angling the rears to around 150 degrees is an acceptable compromise. If there’s no usable space behind the listener at all, stick with 5.1 rather than forcing rear speakers into a compromised spot. A well-placed 5.1 system consistently outperforms a badly-placed 7.1 one.
Adding Height: Dolby Atmos Basics
Dolby Atmos adds a genuine third dimension by placing height or overhead speakers. This is typically in the front corners of the ceiling for a 5.1.2 setup, or all four ceiling corners for 7.1.4.
Rather than assigning sound to a fixed channel the way 5.1 and 7.1 do, Atmos is object-based: the mix places individual sounds at specific points in 3D space, so effects like rain or a helicopter can move naturally overhead rather than being locked to one speaker.
Dolby recommends mounting height speakers at 30–55 degrees of elevation from the listening position, with 45 degrees as the ideal middle ground.
If ceiling-mounted speakers aren’t practical, upward-firing add-on modules (sitting on top of your existing front speakers and bouncing sound off the ceiling) are a widely used, much easier-to-install alternative that still produces a real height effect in most rooms.
Subwoofer Placement: The Step Most People Get Wrong
Where you put the subwoofer changes how it sounds more dramatically than any other speaker in the room, because low frequencies interact heavily with room dimensions and boundaries.
The subwoofer crawl is the most reliable way to find the right spot. Place the subwoofer at your main listening position, play a bass-heavy test track, then physically crawl around the room’s floor perimeter listening for where the bass sounds smoothest and most extended.
That’s where the subwoofer should actually go. Corner placement produces the loudest output but often the boomiest, least even response, so louder isn’t necessarily better.
For rooms wider than roughly 14 feet, adding a second subwoofer at the opposing side-wall midpoint dramatically improves consistency between seats. It is a common complaint with single-sub setups that bass sounds great in one seat and thin or boomy in another.
If you’re also weighing where a soundbar or subwoofer combo fits into a smaller room, our guide on soundbar placement covers a lot of the same room-acoustics logic for a simpler setup.
Wiring: Gauge, Polarity, and Connections
- Wire gauge: 16-gauge speaker wire is sufficient for most runs under 50 feet; for longer runs or a subwoofer needing to handle more current, 14-gauge reduces resistance loss.
- Polarity matters. Every speaker wire has a positive and negative conductor (usually marked by a stripe, ridge, or color) that must match the corresponding positive/negative terminal on both the receiver and the speaker. Getting this backward on even one speaker causes phase cancellation. Means that bass and dialogue will sound thin and poorly centered even though every speaker is technically working.
- Banana plugs make connections faster, more secure, and easier to troubleshoot later than bare wire twisted into spring clips, and they’re worth the small extra cost for a system you plan to keep for years.
- Going wireless for rears: Modern ecosystems (like Yamaha’s MusicCast Surround) let compatible wireless speakers stand in for wired rear or surround channels, with the receiver automatically compensating for the small network transmission delay during calibration. This is a genuinely practical option for rooms where running wire to the back of the room isn’t feasible, and testing has shown wireless rears calibrate almost identically to wired ones on supporting receivers.
If you’re running wire to rear or surround speakers, a basic pair of banana plug sets (available on Amazon) makes the whole install noticeably easier to manage and revisit later than bare-wire clip connections.
Receiver Calibration: Why You Shouldn’t Skip It
Every modern AV receiver includes some form of automatic room calibration. Audyssey, YPAO (Yamaha), MCACC (Pioneer/Onkyo), or similar, and running it is one of the highest-value, lowest-effort steps in the entire setup process.
Here’s what the process actually does:
- Verifies wiring. The calibration mic and test tones confirm each speaker is connected with correct polarity before measuring anything else. It is a good first checkpoint if something sounds off later.
- Detects speaker size. The system classifies each speaker as “large” or “small” and, for smaller speakers, redirects deep bass to the subwoofer instead. This protects smaller speakers from bass they weren’t designed to reproduce.
- Measures distance and sets delay. Each speaker gets a precise timing delay, so sound from every speaker reaches your ears simultaneously, regardless of physical distance.
- Applies room correction EQ. More advanced calibration tiers compensate for boominess caused by nearby walls and furniture, and some systems take multiple measurements around the seating area to widen the effective “sweet spot” rather than optimizing for a single point.
A few practical tips for getting a clean calibration:
- Place the calibration microphone at ear height in your primary listening seat. That position gets the most weight in the correction.
- Run calibration in a quiet room; background noise (HVAC, other electronics) skews the measurement.
- Good placement still matters even with calibration active. Auto-EQ compensates for room issues; it doesn’t replace correctly angled and positioned speakers.
- If your subwoofer or a specific speaker reads as an obviously wrong distance (a common troubleshooting report), re-run the calibration and check that the microphone hasn’t been moved or bumped mid-test, and that no other audio source was playing in the background.
Common Setup Mistakes
- Placing the subwoofer wherever it’s least visible rather than where it actually sounds best. Do the subwoofer crawl before deciding a spot is final.
- Aiming surrounds directly at the back of the listener’s head instead of angling them down and toward the seating area.
- Skipping auto-calibration because manual setup feels more precise. In almost every real room, calibration catches timing and level issues that are very hard to dial in by ear alone.
- Reversed polarity on even one speaker, which causes subtle but persistent phase issues that are often misdiagnosed as a “bad” speaker.
- Overbuying channels for a room that can’t fit them properly. A crowded 7.1.4 setup in a small room often sounds worse than a well-placed 5.1.
- Obstructing the center channel behind a soundbar shelf, decor, or a TV stand lip, which is one of the most common (and most fixable) causes of unclear dialogue.
Troubleshooting Quick Reference
| Symptom | Likely Cause |
|---|---|
| Dialogue sounds muffled or unclear | Center channel obstructed or poorly aimed; check placement first |
| Bass sounds different in different seats | Subwoofer position; try the subwoofer crawl, or add a second sub in wider rooms |
| Sound feels “hollow” or thin despite all speakers working | Reversed polarity on one or more speakers |
| Surround effects feel like they’re behind you instead of around you | Surround speakers angled too far back; adjust toward 90–110° with a slight downward tilt |
| Wireless rear speakers seem delayed or out of sync | Confirm receiver and speakers support the same wireless surround standard, then re-run calibration |
| Calibration reports a wildly wrong distance for one speaker | Re-run in a quiet room with the mic undisturbed; check the speaker’s own wiring and polarity |
Frequently Asked Questions
Is 5.1 or 7.1 better for a home theater?
5.1 is the right baseline for most rooms and is what most content is actually mixed for. 7.1 is worth the extra speakers mainly in larger or longer rooms where side-only surrounds leave a noticeable gap behind the seat.
Where should surround speakers be placed in a 5.1 system?
To the sides of your listening position, at roughly 90–120 degrees from center, mounted about two feet above seated ear level and angled slightly down toward the seating area.
How do I find the best subwoofer placement?
Use the “subwoofer crawl”: place the sub at your listening seat, play a bass-heavy track, then crawl around the room’s floor perimeter to find where the bass sounds smoothest. That’s typically the best spot.
What speaker wire gauge do I need for surround speakers?
16-gauge is sufficient for most runs under 50 feet. Use 14-gauge for longer runs or for a subwoofer connection carrying more current.
Do I need to run auto-calibration if I’ve placed my speakers carefully?
Yes. Calibration corrects for timing, level, and room-reflection issues that careful placement alone can’t fully solve, and it takes only a few minutes.
Can I use wireless speakers for surround or rear channels?
Yes, if both your receiver and speakers support the same wireless surround standard (such as Yamaha MusicCast Surround). The receiver compensates for the small transmission delay automatically during calibration.
What is Dolby Atmos and do I need ceiling speakers for it?
Atmos adds a height dimension to surround sound by placing individual sounds in 3D space rather than fixed channels. True ceiling-mounted height speakers give the best result, but upward-firing modules on top of existing speakers are a practical, easier-to-install alternative.
Why does my dialogue sound unclear even though all speakers are working?
Check the center channel’s placement and aim first. It’s the most common cause, especially if it’s tucked behind a TV stand lip or angled away from the main seat.
How many subwoofers do I need?
One is standard for most rooms. Rooms wider than about 14 feet benefit noticeably from a second subwoofer placed at the opposing side wall, since it evens out bass response between different seats.
What’s the difference between Audyssey, YPAO, and MCACC?
They’re each manufacturer-specific automatic room-calibration systems (Denon/Marantz, Yamaha, and Pioneer/Onkyo, respectively) that perform largely the same core job, like measuring speaker distance, level, and room acoustics, with varying levels of sophistication depending on receiver tier.
Should I connect my surround system through HDMI ARC/eARC or a full AV receiver?
A full AV receiver with individually wired (or wireless) speaker channels will always outperform an ARC/eARC soundbar-style connection for true multi-speaker surround. If you’re deciding between the two approaches, our guide to HDMI ARC vs. eARC explains what each connection actually supports.
Do I need identical speaker brands for every channel?
Matching, or at minimum timbre-matched, front left/right/center speakers is genuinely important since they carry the majority of on-screen sound. Surround and height speakers have more flexibility, since their job is more about ambience and directional effects than tonal consistency with the screen.
Found this guide useful? Share it with someone interested in AV-related guides. Follow us on Facebook and Twitter for more tips, tricks, and guides.
We also ask that you bookmark this page for future reference, as we are constantly updating our articles with new information.
Sign up for our free newsletter as well to receive fresh information immediately in your inbox and keep technically up to date.
Disclosure: If you follow our links to a retailer’s website and make a purchase, we will get an affiliate commission on some, but not all, of the items or services we promote. This will not change the price for you.
You May Be Interested in Reading:
- Headphones vs. Speakers: Which Is Better for Listening to Music?
- TV vs Monitor: Can You Use a Monitor as a TV (or Vice Versa)?
- HDMI 2.1 Explained: What It Actually Means and Do You Need It?
- Firewalla vs. UniFi Dream Machine: Which Is Better for a Home Network?
- How to Set Up a VLAN for IoT Devices on Your Home Router (Step-by-Step)