
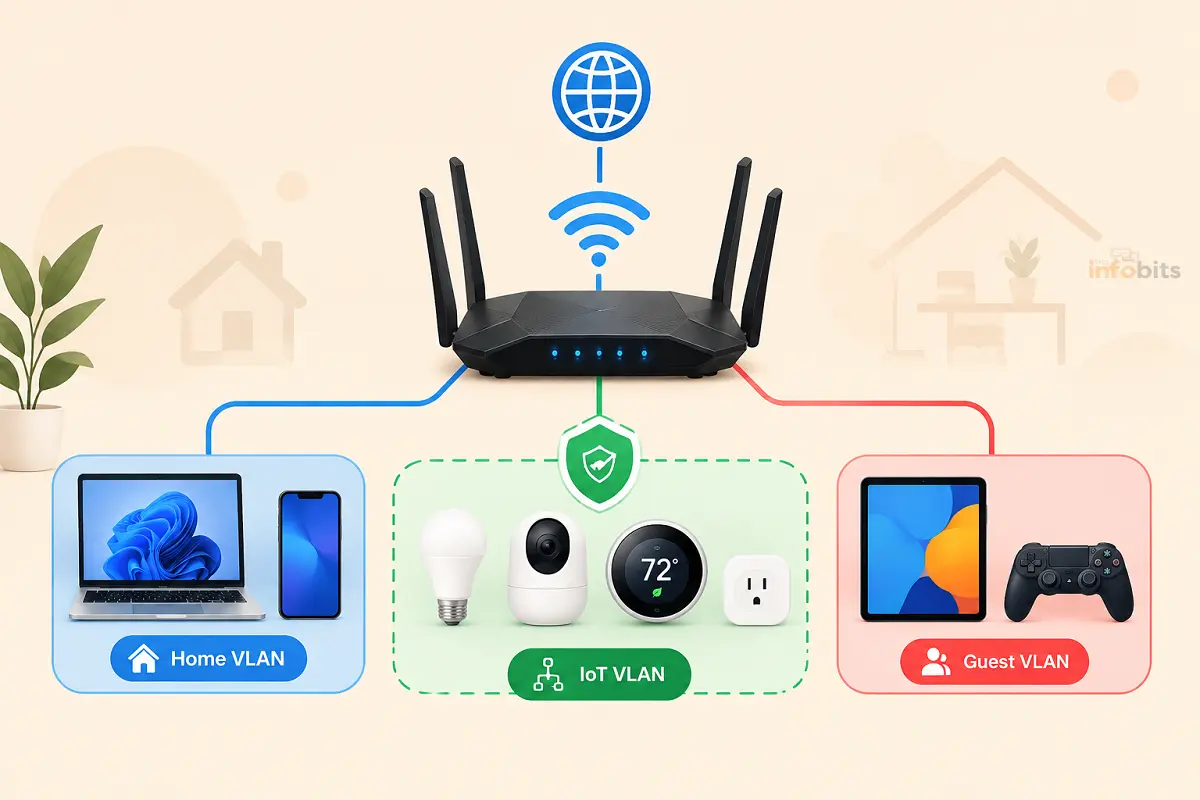
How to Set Up a VLAN for IoT Devices on Your Home Router (Step-by-Step)
Smart plugs, robot vacuums, video doorbells, budget security cameras – the average smart home now has dozens of connected devices like these, and most of them were never built with security as a priority.
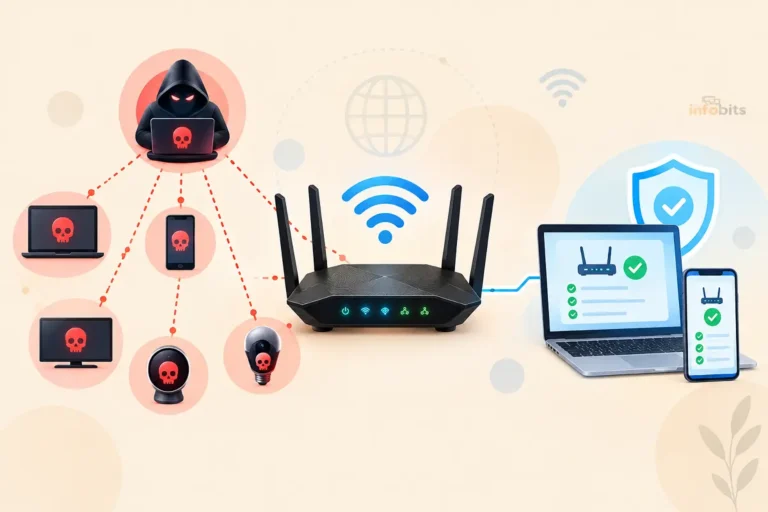
Many run outdated firmware, phone home to servers you can’t audit, and sit on the same network as your laptop, your phone, and any files you share over Wi-Fi. A VLAN fixes the part of that problem you can actually control. It stops a compromised smart bulb from ever being able to see your computer in the first place.
Quick answer: To set up a VLAN for IoT devices, you need a router (or router-plus-switch combo) that supports 802.1Q VLAN tagging, then you create a second virtual network, assign your smart devices to it, and add a firewall rule that lets that network reach the internet but blocks it from talking to your main network. On most consumer routers, this takes 15–30 minutes. On business-class or open-source firmware, it takes longer but gives you far more control.
This guide walks through what a VLAN actually does differently from a regular guest network, whether your current router can even do this, and exact steps for the most common consumer platforms; plus the mistakes that make people think their IoT network is isolated when it isn’t.
VLAN vs. Guest Network: They’re Not the Same Thing
This is the single most common point of confusion, and it matters because a lot of routers market a feature as “IoT protection” that isn’t actually a VLAN.
A basic guest network creates a separate SSID with its own password, but on many consumer routers, especially standard NETGEAR Orbi and Nighthawk systems, that “IoT network” toggle is just another Wi-Fi name broadcasting on the same underlying LAN.
It has full visibility into your main network, according to NETGEAR’s own community forum, where staff have clarified that only the business-oriented Orbi Pro line actually supports VLAN tagging for wireless clients; standard home Orbi and Nighthawk systems do not.
A true VLAN (Virtual Local Area Network) is a logical partition of your network enforced at the switch and router level using 802.1Q tagging. Devices on the IoT VLAN get their own subnet, and, critically, a firewall rule explicitly blocks that subnet from initiating any connection to your main LAN.
A compromised device on a real VLAN can still reach the internet, but it cannot see, ping, or scan anything on your trusted network. That distinction- an explicit deny rule between VLANs, not just a different SSID – is what actually stops a hacked smart plug from becoming a stepping stone to your laptop.
Do You Even Need a VLAN? A Quick Gut Check
- You have more than a handful of smart devices, especially cheap ones from brands you don’t fully trust → yes, this is worth doing.
- You run a local smart-home hub like Home Assistant that needs to talk to devices on the IoT network → yes, and you’ll need one extra firewall rule to allow that specific traffic through.
- You have one or two smart plugs and nothing else → a simple guest network (see our guide on creating a secure guest network) may be enough without the added complexity.
- Your router doesn’t support VLANs at all → skip to the “What If Your Router Can’t Do VLANs?” section below before buying new hardware.
What You’ll Need
- A router or router-plus-switch setup that supports 802.1Q VLAN tagging. Basic ISP-provided gateways do not support this, mostly.
- A managed switch, only if you have wired IoT devices (a PoE camera, a wired hub, a wired NVR) that need to be assigned to the VLAN. Wireless-only smart homes can usually skip this.
- 15–60 minutes, depending on your router’s interface and how comfortable you are with firewall rules.
- The admin login for your router.
How to Set Up a VLAN for IoT Devices: General Steps
The exact menus differ by brand, but every platform follows the same underlying logic:
- Create the new VLAN. Give it an ID (a common convention is VLAN 20 or similar for IoT) and its own subnet, separate from your main LAN.
- Create a dedicated SSID and bind it to that VLAN. This is the Wi-Fi network your smart devices will actually connect to, something like “Home_IoT.”
- Set up DHCP for the new VLAN so devices on it get IP addresses automatically, just like your main network.
- Add a firewall rule blocking IoT-to-LAN traffic. This is the step people skip, and it’s the one that actually matters; without it, you have a differently named network, not an isolated one.
- Allow IoT-to-internet traffic, since most cloud-controlled smart devices only need to reach the manufacturer’s servers, not your local network.
- Add narrow exceptions only where needed; for example, allowing your IoT VLAN to reach a specific Home Assistant server on a specific port, rather than opening the whole LAN back up.
- Move wired IoT devices to VLAN-tagged switch ports, if you have any, using a managed switch.
- Test it. Connect a device to the new SSID and confirm it can reach the internet but cannot ping or access anything on your main network.
Setting It Up on ASUS Routers (Guest Network Pro)
Most current ASUS routers handle this through a feature called Guest Network Pro, which is ASUS’s consumer-friendly implementation of VLANs and SDNs (Software-Defined Networks).
It lets you create multiple independent networks with their own access permissions, bandwidth limits, and, notably, a dedicated network profile built specifically for IoT devices.
- Log in to your router at
router.asus.comor through the ASUS Router app. - Go to Guest Network Pro (on ExpertWiFi-series routers, this may appear as SDN).
- Create a new network and select the IoT profile template, which comes pre-configured with client isolation from your main LAN.
- Set your SSID and password for the new network.
- If you’re using AiMesh, sync the new network to your mesh nodes so it’s available network-wide.
- For wired IoT devices connected through a managed switch, assign the correct switch ports to the matching VLAN ID. ASUS typically auto-assigns VLAN tags (often in the 500 range) to guest and IoT profiles, though newer firmware lets you set custom VLAN IDs manually.
One caveat worth knowing: AiMesh’s wireless VLAN sync has historically been inconsistent across nodes on some firmware versions, according to user reports on ASUS’s own support forums. If you’re running a multi-node AiMesh setup, test connectivity from each node individually rather than assuming the isolation carried over correctly.
Setting It Up on TP-Link (Omada and Deco)
TP-Link’s approach differs depending on whether you’re using standard Archer/Deco hardware or the Omada ecosystem.
On TP-Link Omada (the more VLAN-native option): the Omada Software Controller or OC200 hardware controller gives you full 802.1Q VLAN management, making it one of the more approachable options for home users who want real VLAN control without an enterprise-grade learning curve.
Create the VLAN, assign it to a wireless network profile, and configure ACL (access control list) rules to block inter-VLAN traffic to your main LAN.
On standard TP-Link Deco or Archer routers, VLAN support is more limited and varies by model and firmware version. Check your specific router’s documentation, since not every consumer Deco unit exposes full VLAN tagging in the app.
Setting It Up on NETGEAR (Orbi Pro Only)
This is the platform where expectations and reality diverge most. Standard consumer Orbi and Nighthawk systems offer an “IoT network” toggle, but it is not a true VLAN. It’s a separately named SSID with, in NETGEAR’s own words on their community forum, no special isolation beyond being a different network name. It wasn’t designed to keep IoT traffic from reaching your main LAN.
If you want genuine VLAN isolation on NETGEAR hardware, you need the Orbi Pro line, which supports four pre-defined VLANs out of the box ( Default, Employee, Guest, and IoT ), each independently configurable:
- Log in at
orbilogin.com. - Go to Advanced > Advanced Setup > VLAN/Bridge Settings.
- Configure the pre-built IoT VLAN (VLAN 40 by default) or create a new one, and enable Client Isolation and Network Isolation.
- Go to Advanced > Setup > LAN Setup, select the LAN tab, enable it, and assign your VLAN profile with its own subnet and DHCP settings.
- Assign port membership under VLAN/Bridge Settings if you have wired devices to isolate.
If you own standard consumer Orbi or Nighthawk hardware and want real VLAN isolation without buying Orbi Pro, your practical options are dropping in a VLAN-capable router ahead of it (running it in access-point mode) or switching to open-source firmware where supported.
Setting It Up on OpenWrt (Advanced, But Free and Flexible)
For routers running OpenWrt, VLAN configuration happens in Network > Switch (or Network > Devices on newer DSA-based firmware):
- Add a new VLAN ID under the switch’s VLAN section, and make sure the CPU port is tagged for it while the LAN port(s) you want to use are set to untagged for that VLAN only.
- Under Network > Interfaces, add a new interface for the VLAN, name it (e.g., “IoT”), and select the corresponding VLAN device (something like
eth0.20). - Assign it an IP address, subnet, and gateway distinct from your main LAN.
- Click Setup DHCP Server for the new interface.
- Under the interface’s Firewall Settings tab, create a new firewall zone for it (e.g., “iot”) rather than assigning it to your existing LAN zone.
- In Network > Firewall > Zones, edit the new zone so it can reach WAN (internet) but has no forwarding rule into your LAN zone. This is the step that actually creates the isolation.
- Create the matching wireless SSID and bind it to the new interface under Network > Wireless.
If you’re deciding whether OpenWrt is the right path for your hardware in the first place, our comparison of DD-WRT vs. OpenWrt and our list of the best OpenWrt routers are good starting points before you commit to a flash.
What If Your Router Can’t Do VLANs?
Plenty of consumer and ISP-provided routers simply don’t expose 802.1Q VLAN controls. You have a few realistic options:
- Add a dedicated security router or firewall appliance ahead of your existing router, such as a Firewalla unit, which can create genuinely isolated network segments without replacing your main router.
- Flash supported hardware to OpenWrt or DD-WRT, if your router model supports it, to unlock VLAN features the stock firmware hides.
- Fall back to a strong guest network as a partial mitigation; not as secure as a true VLAN, but meaningfully better than putting every smart device on your main network. See our guide on securing IoT devices on your home Wi-Fi for guest-network-based steps.
- Use a second physical router dedicated entirely to IoT devices, connected to your main router’s LAN port and configured as its own subnet, a simpler, if less elegant, form of segmentation. Our guide on using a second router for a guest network covers the wiring basics.
If your current router turns out not to support VLANs at all, a dedicated segmentation appliance like the Firewalla Gold Plus sits between your modem and router and can enforce real IoT isolation without forcing you to replace hardware you already like. Else you can use a dedicated router with a VLAN segmentation feature like the Synology RT6600ax, available on Amazon.
Common Mistakes That Leave “Isolated” IoT Networks Wide Open
- Assuming a separate SSID means separate isolation. As the NETGEAR example above shows, a differently named Wi-Fi network is not automatically a VLAN. Check whether your platform actually blocks inter-VLAN traffic by default, because several don’t.
- Forgetting the explicit firewall deny rule. Creating the VLAN interface isn’t enough on most platforms (especially OpenWrt). Without an explicit rule blocking the IoT zone from forwarding into your LAN zone, some firmware defaults will still allow it.
- Leaving wired IoT devices on the wrong switch port. A WiFi-based VLAN does nothing for a PoE camera plugged directly into an untagged port on your main switch. You need a managed switch with matching VLAN port assignments for wired gear.
- Opening the whole LAN back up for one convenience feature. If you need your IoT VLAN to reach a Home Assistant server, create a narrow rule for that one IP address and port, not a blanket allow rule between the two networks.
- Not testing the isolation after setup. Connect a device to the new SSID and try to ping your main router’s LAN IP or reach a shared folder on your main network. If it succeeds, your VLAN isn’t actually isolating anything yet.
Related: How to Monitor Network Traffic on Your Home Router(5 Methods for Every Skill Level)
Myth vs. Fact
Myth: Any router with a “guest network” or “IoT network” feature is giving you a real VLAN. Fact: On many consumer routers ( standard NETGEAR Orbi and Nighthawk systems are a well-documented example), that feature is just a separately named SSID without enforced isolation from your main LAN. Confirm your specific model actually supports 802.1Q VLAN tagging before assuming you’re protected.
Myth: Once you create the VLAN, isolation happens automatically. Fact: On several platforms, especially OpenWrt, you have to explicitly configure a firewall rule denying traffic from the IoT zone into your LAN zone. The VLAN interface alone doesn’t create that block by default.
Myth: A VLAN blocks your smart devices from working properly. Fact: Most cloud-controlled smart home devices only need outbound internet access to reach the manufacturer’s servers. They don’t need to see your laptop or NAS at all, so a correctly configured VLAN typically doesn’t break normal functionality. The exception is locally-controlled systems, like a Philips Hue Bridge or Home Assistant server, which need a specific, narrow exception rule.
Myth: You need enterprise networking gear to set this up at home. Fact: Consumer-grade tools like ASUS’s Guest Network Pro and TP-Link’s Omada controller have made real VLAN segmentation approachable for home users without a networking background, even if the underlying mechanism is the same one used in offices.
Expert Tips
- Use a consistent, memorable VLAN numbering scheme if you plan to add more segments later ( for example, 10 for main, 20 for IoT, 30 for guest ) so future troubleshooting is easier.
- Give the IoT VLAN its own DNS settings if you want an extra layer of ad and tracker blocking specifically for smart devices, separate from your main network’s DNS.
- Document which physical switch ports are tagged for which VLAN somewhere outside the router itself. A sticky note on the switch or a note in your password manager saves real time during future troubleshooting.
- Revisit device placement periodically. New smart home purchases don’t automatically join your IoT VLAN. You have to connect them to the correct SSID or port when you set them up.
- Combine VLAN isolation with the basics. A VLAN doesn’t replace strong Wi-Fi encryption or router firmware updates. Pair it with WPA3 encryption and a periodic check using our guide on detecting unauthorized devices on your network.
Final Thoughts
Setting up a VLAN for IoT devices may sound complicated at first. But the basic idea is simple. Keep your smart home devices separate from the computers, phones, and other devices you trust most.
The most important part is understanding that a separate Wi-Fi name is not always enough. A real IoT VLAN creates network separation and uses firewall rules to stop smart devices from freely reaching your main network. That extra layer can make a big difference if one of your cameras, smart plugs, or other connected devices is ever compromised.
The exact setup will depend on your router. Some ASUS routers make the process easier with Guest Network Pro. TP-Link Omada offers more direct VLAN control. OpenWrt gives you the most flexibility if you are comfortable with more advanced settings. If your current router does not support VLANs, a second router or dedicated security device can still help create better network separation.
Once your VLAN is running, don’t forget to test it. Make sure your IoT devices can reach the internet but cannot access your main LAN unless you have intentionally created a specific exception.
A VLAN is not a replacement for strong Wi-Fi security, regular firmware updates, or good passwords. But when combined with those basics, it is one of the most effective ways to build a safer smart home network.
If you have more smart devices joining your home every year, taking the time to set up proper IoT network isolation is a security upgrade worth considering.
Frequently Asked Questions
What is a VLAN for IoT devices?
A VLAN (Virtual Local Area Network) for IoT devices is a logically separate network segment on the same physical hardware that keeps smart home devices isolated from your computers and phones, so a compromised device can’t reach your main network even though it shares the same router or switch.
Is a VLAN the same as a guest network?
Not necessarily. A guest network is just a separate SSID and may or may not enforce real isolation from your main LAN, depending on your router. A true VLAN uses 802.1Q tagging and explicit firewall rules to block inter-network traffic, which many “guest” or “IoT” toggles on consumer routers don’t actually do.
Do all routers support VLANs?
No. Basic ISP-provided gateways and many entry-level consumer routers don’t expose VLAN controls at all. Mid-range and higher consumer routers from ASUS, TP-Link (especially Omada), and NETGEAR’s Orbi Pro line generally do, as does most open-source firmware like OpenWrt.
Does a VLAN slow down my smart home devices?
No, in normal use. VLANs are a logical separation enforced by tagging, not a bandwidth limit. A correctly configured VLAN doesn’t reduce the speed or responsiveness of the devices on it.
Will my smart devices still work if I isolate them on a VLAN?
Yes, in the vast majority of cases, since most smart devices only need to reach the internet, not your local network. The exception is devices that need to communicate with a local hub or app on your main network, which requires you to add a specific firewall exception.
Can I set up a VLAN without a managed switch?
Yes, if all of your IoT devices are wireless. A managed switch is only necessary if you have wired smart devices ( like a PoE camera or wired hub) that need to be assigned to specific VLAN-tagged switch ports.
Does NETGEAR’s “IoT network” feature actually isolate devices?
On standard consumer Orbi and Nighthawk systems, no. It’s a separately named SSID without built-in VLAN isolation, according to NETGEAR’s own support community. Genuine VLAN tagging on NETGEAR hardware requires the business-oriented Orbi Pro line.
What VLAN ID should I use for IoT devices?
Any unused ID works, but a common convention is something in the 20s (like VLAN 20) or a higher range like 40, matching the pattern used by platforms like Orbi Pro’s default IoT VLAN. Consistency matters more than the specific number.
How do I test whether my IoT VLAN is actually isolated?
Connect a device (like your phone) to the IoT SSID, then try to ping your main router’s LAN IP address or access a shared folder on your main network. If either succeeds, your isolation isn’t fully configured yet.
Can I let my IoT VLAN talk to a Home Assistant server on my main network?
Yes, by adding a narrow firewall rule that allows traffic from the IoT VLAN to that one specific device’s IP address and port, rather than opening broader access between the two networks.
Is Guest Network Pro on ASUS the same as a real VLAN?
Yes. Guest Network Pro is ASUS’s consumer-facing implementation of VLANs and SDNs, and it does apply genuine client isolation from your main LAN when you use the IoT network profile, not just a differently named SSID.
What’s the difference between VLAN and a second physical router for IoT isolation?
A VLAN uses one set of hardware and tagging to logically separate networks; a second physical router creates a separate subnet using entirely separate hardware. VLANs are more efficient and flexible, but a second router is a workable fallback if your primary router doesn’t support VLAN tagging at all.
Do I need to reconfigure my devices after setting up a VLAN?
Yes. Existing smart devices connected to your main Wi-Fi network won’t automatically move to the new IoT VLAN. You’ll need to reconnect each device to the new SSID (or physical port, for wired devices) using its app’s Wi-Fi setup process.
Found this guide useful? Share it with someone interested in networking-related information. Follow us on Facebook and Twitter for more tips, tricks, and guides.
We also ask that you bookmark this page for future reference, as we are constantly updating our articles with new information.
Sign up for our free newsletter as well to receive fresh information immediately in your inbox and keep technically up to date.
Disclosure: If you follow our links to a retailer’s website and make a purchase, we will get an affiliate commission on some, but not all, of the items or services we promote. This will cause no price change for you.
You May Be Interested in Reading:
- Port Forwarding Explained | Setup Guide for Gaming, Remote Work & Servers
- What Happens When Someone Reports You on Instagram?
- How to Get Liquid Out of a Phone’s Charging Port (Safely)
- AiProtection vs. Armor vs. HomeShield: Which Router Security Suite Actually Wins?
- Post-Quantum Cryptography: What It Means for Your Devices

)