How to Fix the No Internet Secured Error in Windows 10 or 11
We are experiencing a variety of network connectivity issues with Windows 10 and Windows 11. The ‘No Internet Secured’ error message is an excellent example of such a problem.
What does no internet secured mean? Let us try to comprehend the situation and propose a solution.
Although we have suggested all of these solutions from the perspective of Windows 10, they can also be applied to internet-secured Windows 11 errors.
What Does No Internet Secured Mean?
The ‘No internet secured’ error message means that the computer is connected to a secure network but is unable to access the internet. When a Windows 10 system connects to the internet via Wi-Fi, this problem occurs.
These issues are displayed in the notification panel or as a pop-up in the system tray. The PC/Laptop is connected to the network during this problem stage, but you are unable to browse the web.
A change in network configurations or settings is the most common cause of this problem.
How to Resolve the No Internet Secured Error?
Even though the problem is straightforward, a single direct solution is not possible. Because the cause of this issue differs from PC to PC.
However, before delving deeper into the proposed solution, determine whether the problem affects only Windows PCs or all devices on your local network.
Let us examine each scenario to see if we can find a solution.
Case 1: None of the Devices in Your Network Have Internet Access
Internet access is not available on all devices connected to the same Wi-Fi network in this case. Here, the issue could be with your router or access point.
The first thing we should do in this situation is reset the router or access point. Turn off the router for at least 10 seconds before resuming use. If you’re using a separate access point that isn’t built into the router, restart it in the same manner.
Check if your PCs are connected to the internet immediately after restarting the router/access point.
If this is not the case, restart the devices and reconnect them to the network. If none of the devices have internet access, there is no need to read these solutions, and you can skip ahead to this section.
Related: What Should You Do If Your Internet Access Is Blocked or There Is No Internet Connection?
Case 2: Only Windows Computers Do Not Have Internet Access
Except for the Windows PC, we have internet access on all of our network devices in this situation. We must take each of the numerous options presented here one at a time.
We guarantee that in the vast majority of cases, one of these methods will be effective for you. Also, make certain that the problem is limited to your specific PC.
1. Restart Your Network Connections
This is the first and most common solution to any network problem.
In the system tray, select the Wi-Fi connection icon. Tap the Disconnect button next to the associated network in the list. Wait a minute before clicking the Connect button to connect to the same network.
If your internet connectivity problem has not been resolved, proceed to the next step.
2. Restart Your Computer
As you are aware, restarting the computer is the most basic and straightforward way to resolve the vast majority of issues with devices running any operating system.
As a result, we’ll restart the machine and see if the problem has been resolved.
If you’re unlucky! Don’t be concerned. Proceed to the third option.
3. Remove or Disable Anti-Virus and Internet Security Software
Turn off any internet security software you have installed, such as Kaspersky Total Security or Norton Internet Security. They are, without a doubt, the best security suites on the market. However, these programs have a history of causing problems with your internet connection.
By interfering with your network connection, some antivirus software can occasionally display a No Internet, Secured warning and other issues. Many people have reported this issue with Comodo Antivirus as well, so if you use it, keep an eye on it.
To resolve the issue, disable some of your security software’s features, such as the firewall, and see if that solves the problem.
If the problem persists after deactivating these features, you might want to consider completely disabling your antivirus/internet security software. Finally, you could try uninstalling it to see if that resolves the issue.
If removing the antivirus software resolves the issue, now is an excellent time to consider switching to new security software. You can get full protection for your PC by using a lightweight antivirus like ESET Internet Security.
4. Run the Windows Network Troubleshooter
Windows 10 includes several troubleshooters that can assist you in resolving common PC issues, and if you’re seeing the No Internet, Secured warning, a network troubleshooter may be able to assist.
>> Open the Settings app by pressing Windows Key + I
>> Navigate to the Update & Security tab
>> Click Troubleshoot from the left-hand menu
>> Click Additional troubleshooter
>> Select Internet Connections from the opened window
>> Click to run the troubleshooter button.
After the troubleshooter has finished, see if the problem persists. If the problem persists, try running the Network Adapter Troubleshooter in the same way to see if it fixes the problem.
5. Update the Driver for Your Network Device
In some cases, an internet connectivity problem in Windows can be caused by a problem with the network device’s driver. We’ll try to update the network device driver at this point.
As you may know, a driver is a small piece of software that allows a connected device to communicate with the operating system. These programs are frequently created by the hardware manufacturers themselves.
It should be noted that minor flaws in this driver software can cause the system-connected device to malfunction.
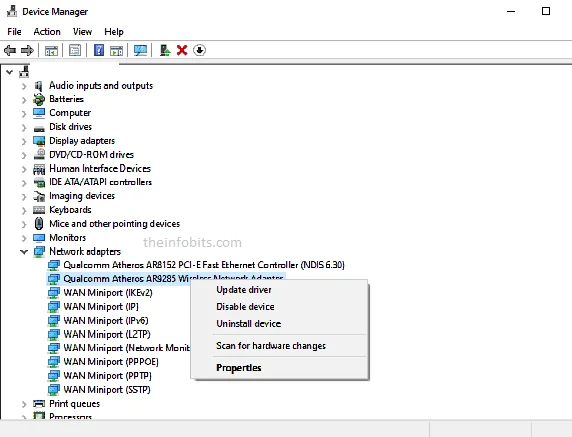
>> Select Device Manager by right-clicking on the Windows Start button.
>> Expand Network adaptors.
>> To access your network device’s settings, right-click on your wireless adaptor.
>> Then, from the drop-down menu, choose Update Driver.
>> Wait for the network device driver to be updated for some time.
Restart your system after updating the driver, and your internet connection should be restored in most cases.
6. Disable and Enable Network Adaptor
Repeat the preceding steps to disable the network device if the computer is not connected to the internet. Before enabling this network device, restart your computer.
If your computer cannot connect to the internet, repeat the preceding steps until the network device is chosen. Select Uninstall from the menu that appears when you right-click on the network device.
Windows will now remove your network adapter device. In the Device Manager pane, click Network Adapters again, and then click the Action button at the top of the window.
You’ll see several options here; choose Scan for Hardware Changes. Windows will automatically detect and replace the network adapter.
Restart the machine to see if the internet connection is active.
7. Disable the 5 GHz Wi-Fi Band
This step genuinely resolved the “no internet secured” issue on some Windows 10 machines. All of the preceding steps should be completed first, and then this method should be tried on the way.
Nowadays, almost every laptop can connect to both 2.4GHz and 5GHz wireless network bands. In some computers, connecting to the 5GHz band causes this problem.
Because your laptop will constantly attempt to connect to the faster 5Ghz network, we’ll turn it off to see if this resolves the no internet connectivity issue.
>> Select Network Connections by right-clicking the Start button or pressing the Windows key + X.
>> Navigate to Change adapter options
>> Select your wireless network by double-clicking it.
>> Click on the Properties button
>> Select Configure.
>> Open the top Advanced tab
>> Select the wireless mode 802.11n/ac and change to Disabled
>> When you click OK, your wireless network should reconnect over 2.4GHz
If your internet connection is restored, you can check to see if 802.11n is the only option. In my case, the only source of the wifi no internet connectivity problem was the 802.11ac protocol.
To permanently resolve the issue, check for a firmware update for your access points or downgrade to an older version.
An update to an access point’s driver or firmware may also cause connectivity issues in some cases.
8. Turn Off Wi-Fi Sharing and Wi-Fi Hotspot Software
Wi-Fi Sharing or hotspot applications may cause configuration issues in your network adapter.
If you’re running this type of software, try updating it first, or uninstalling it if that’s not an option.
If the message “No internet secured” persists after upgrading or uninstalling any non-Microsoft components, the network adapter must be disabled.
>> Right-click the Start button
>> Select Network Connections
>> Go to Change adapter options selection
>> Double-click on your wireless network.
>> Click the Properties button
>> Disable all non-Microsoft items.
>> Reboot your computer.
9. Modify the Windows Power Plan Settings
The energy-saving or balanced power plans in Windows 10 may limit your computer’s capabilities. As a result, network connection failures such as “No Internet, Secured” may occur, preventing you from accessing the Internet.
>> Right-click on the Windows 10 Start button
>> Select Power Options.
>> Choose Additional Power Settings from the Related settings.
>> Click Change plan settings from the Selected plan
>> Choose Change Advanced Settings.
>> Check that Wireless Adapter Settings -> Power Saving Mode is set to Maximum Performance.
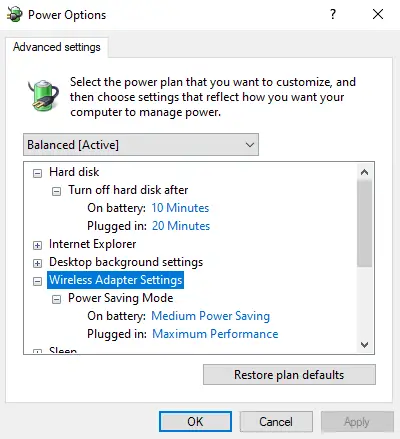
>> Repeat for the PCI Express >Link State Power Management by setting to Maximum Performance
>> Close the windows by clicking Apply.
10. Check the Network Connection Properties on Your Computer
In this step, you have to examine the Windows PC’s Network and internet settings. Simply right-click the Wi-Fi icon in the system tray and select Open Network & Internet settings from the resulting menu.
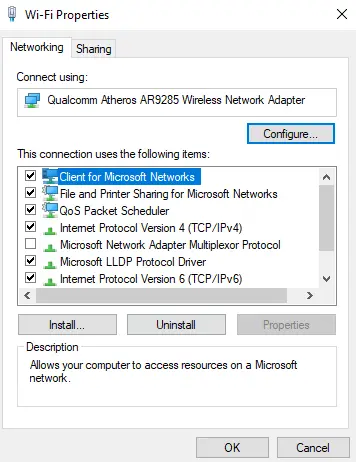
Then, in the newly opened window, navigate to the adapter settings. When you right-click on your Wi-Fi connection, choose Properties from the drop-down menu.
Then, double-check that the following items are checked.
- Client for Microsoft Networks
- File and Printer Sharing for Microsoft Networks
- Internet Protocol Version 4 (TCP/IPv4)
- Internet Protocol Version 6 (TCP/IPv6)
- Link-layer Topology Discovery Responder
- Link-layer topology discovery mapper I/O driver
- Reliable Multicast Protocol
If you have made any changes, restart the machine. Unplug any Ethernet connections that are connected to your computer.
11. Enable IPv4 Only
IPv4 is an older networking protocol that predates IPv6. Despite having some advantages over IPv4, IPv6 is more prone to errors.
In our example, try reconnecting to the machine using only the IPv4 protocol. By following the instructions in the previous solution, uncheck Internet Protocol Version 6 (TCP/IPv6).
Restart your Windows 10 machine to confirm your selection.
12. Disable the VPN Connection
Many PCs using a VPN to connect to the internet have reported “No Internet Security” issues. It could be because of errors in the VPN program or inactivity on the VPN server.
If you use a VPN, consider temporarily disconnecting it and connecting your PC directly to the internet. If you had an issue with VPN software, you can now simply connect to the internet.
13. Reset Winsock
Winsock is an abbreviation for Windows Socket API, which is responsible for your computer’s network communication while it is connected to the internet.
Another method for dealing with the “No Internet Secured” error is to reset Winsock. To perform the Winsock reset, type the following command.
netsh winsock reset catalog
The network connection will be reconnected immediately after you run the command. If it does not reconnect automatically, reconnect the network connection manually.
14. Reset Windows IP Configuration
We’re attempting to refresh the IP configuration in this step by requesting a new IP address from the router. To accomplish this, use Windows PowerShell and the commands listed below.
Right-click the Start button and select Windows PowerShell. Enter the following command in the Windows PowerShell window.
ipconfig /release
ipconfig /renew
Running these instructions will give your computer a new IP address and, in most cases, solve the internet problem.
15. Clear Your DNS Cache
In this method, we try to clear the DNS cache with the command below. Enter the following into the command prompt:
IPCONFIG /flushdns
This will usually clear your computer’s DNS cache and resolve the internet connection issue.
16. Configure a Dedicated DNS Server
The DNS server may typically be the source of the problem. The DNS server is responsible for translating domain names into IP addresses.
You cannot connect to the internet unless your DNS server is operational. In this solution, we’re going to use Google DNS servers (8.8.8.8 and 8.8.4.4). You can also use Cloudflare DNS servers (1.1.1.1 and 1.0.0.1).
>> Right-click on Start and select Network Connections
>> Select Change Adapter Options
>> Open your Network Adapter by double-clicking on the Wi-Fi Adapter
>> Select Properties
>> Double-click on Internet Protocol Version 4 (TCP/IPv4)
>> Check to use the following DNS server addresses
>> Enter the following IP Address
>> Preferred DNS server: 8.8.8.8
>> Alternate DNS server: 8.8.4.4
>> Click OK and check if the No Internet secured error is solved.
17. Uninstall Third-Party Applications That Cause Problems
Third-party software may cause No Internet, Secured messages to appear. Applications that manage your network connections are a common source of this problem.
Some users claimed that the Intel ProSet application was the source of the problem on their PC, but that after uninstalling it, the problem was completely resolved.
There are several methods for uninstalling an application, along with uninstalling programs through the control panel or using reputable third-party uninstaller software.
Using uninstaller software is the most effective way to ensure that you have complete control and that no remnants of uninstalled programs remain. If you are unfamiliar with these programs, they can delete any application from your computer, along with all of its files and registry data.
There are many good uninstaller programs out there, but IObit Uninstaller is one of the best, so give it a shot.
No Internet Secured Error on Different Devices
As previously discussed, if you are receiving this error on all of your devices, restart your modem/router and check to see if the problem has been resolved.
Otherwise, consider the following options.
1. Temporarily Disable the Wi-Fi Extender Connection
Wi-Fi range extenders can occasionally cause wireless networking conflicts. So, check to see if your internet access is available on the devices without the use of these extenders.
If you use power line adapters or wireless network extenders that plug into a wall outlet, make sure they all belong to the same electrical group.
If your network isn’t functioning properly without them, try relocating the adapters closer together.
2. Do You Have an Issue with Both the Wired and Wireless Connections?
If you’re still having network connection problems, determine whether the problem is limited to your wireless network or if it also affects your Ethernet cable connection.
Connect your laptop to the network with an Ethernet cable. If you can now connect to the internet, we’ll focus on your wireless network. When a wired connection fails, we must look to the router.
If both wired and wireless networks are unavailable, the problem is most likely with your router or modem. If you have a modem and a router, ensure that the modem is in bridge mode and that DHCP is disabled.
3. Attempt a Different DNS Server
Even the strongest Wi-Fi signal is rendered ineffective if your device is linked to a DNS server that contains incorrect or unavailable data.
To see if the web pages eventually load, select an alternate DNS server and update the DNS server settings on your router.
The DNS server of your ISP may not always be fully operational. In this case, you can rely on the dependable DNS servers of Google, Cloudflare, or OpenDNS.
4. There Is No Internet Access Through a Wireless Network
Here, the problem only appears when you connect to your wireless network. If you have a separate access point, make sure DHCP is turned off.
Check the following wireless network settings in general. Change the channel of your wireless network. If it’s set to automatic, change it to channel 6 for 2.4GHz and 44 for 5GHz. Reduce the 5Ghz band’s channel width to 20Mhz.
5. Update Your Router Firmware
The majority of router/modem issues can be resolved by updating their firmware. Check the respective user manual for instructions on how to properly perform the firmware update.
Conclusion
We guarantee that the ‘No Internet Secured’ error will be removed at any time during the implementation of the solutions mentioned above. You were able to resolve the problem of insecure internet access.
Also, we’d like to know what steps you’ve taken when you encounter a No Internet Secure error on Windows 10.
Frequently Asked Questions
Why am I seeing the “No Internet Secured” error on my Windows 10/11?
This error is often caused by network driver issues, internet connection troubles, or improper network settings.
How can I determine if the “No Internet Secured” error is caused by outdated network drivers?
To see if outdated network drivers are to blame, open Device Manager, select your network device, and check for any available driver updates or error messages.
Is it necessary to restart both my router and PC when troubleshooting the “No Internet Secured” error?
It is advised that you restart both your router and your computer to refresh the network connection and resolve any short-term problems that may be generating the error.
Can disabling IPv6 impact my network connection?
Because most networks rely largely on IPv4, disabling IPv6 should have little effect on your network connection. In rare circumstances, though, certain networks or applications may require IPv6 for maximum performance. As a result, re-enabling IPv6 is recommended if you encounter any problems after deactivating it.
We hope you found this post informative, and do like and follow us on Facebook and Twitter for regular updates.
We also ask that you bookmark this page for future reference. Sign up for our free newsletter as well to receive fresh information immediately in your inbox and keep technically up to date.

