11 Easy Fixes for Windows 10 Action Center Not Opening Problem
We all know that the Windows Action Center is an important communication tool in Windows 10. It is also referred to as the Windows notification center.
A Windows user receives important system information and application setting notifications from this notification area.
These notifications appear in the bottom right corner of the desktop, and we can access them manually by clicking on the message icon in the far right corner of the Windows 10 taskbar.
However, the Windows 10 Action Center is not always. In some cases, it opens and then immediately closes.
In certain situations, we receive a notification but are unable to locate it when we open the action center window.
Let us investigate the cause and solution of this Windows 10 Action Center not opening malfunction.
Why Is the Windows 10 Action Center Not Working?
The Action Center is an extremely useful feature. It does, however, fail on occasion.
Most of the time, the Windows 10 Action Center keeps closing or does not stay open after a major Windows 10 update.
In this case, we assume that the problem is caused by system file corruption, an absence of system files, or a bug in the operating system.
The action center is sometimes accidentally disabled in the system settings by the user. If this is the case, we can easily enable the action center in the system configurations.
Other causes of the Windows 10 notification center not opening include user profile corruption or severe system flaws.
If the Windows 10 Action Center won’t open, you will not receive important notifications. Here’s how to put things right.
Whatever the case may be, we can go over each solution one by one as described below.
1. Restart Windows 10
As a regular Windows user, you are aware that the vast majority of issues in Windows can be resolved by restarting the operating system.
As well, restart your computer to check the status of the Windows 10 Action Center problem. If you believe it is still unresolved, read the in-depth solutions below.
2. Check Whether the Action Center Is Enabled in Settings
As previously stated, if the notification or action center in Windows 10 is disabled in the system settings, it will not function.
1. Click the notification icon in the taskbar’s bottom right corner, or press Windows Key+A. If the action center window does not open, it means that the action center is disabled and must be enabled.
2. Open the settings menu by clicking the Windows start button or by pressing Windows key+I.
3. Select Personalisation from the Settings screen
3. Click on the Taskbar from the left navigation menu.
4. Under the heading Notification Area, click on the System Icon on or off.
5. The toggle switch for Action Center can be found here. If it is turned off, use the toggle switch to enable it.
If the Windows 10 Action Center still does not open, proceed to the next step.
3. Restart Windows Explorer
We restart Windows Explorer in this solution.
If the non-responsiveness of the Windows 10 Action Center is caused by temporary glitches in the system files, restarting Windows Explorer will resolve the issue.
1. Select Task Manager from the menu that appears when you right-click the taskbar.
2. Right-click on Windows Explorer in the Task Manager window that has just opened.
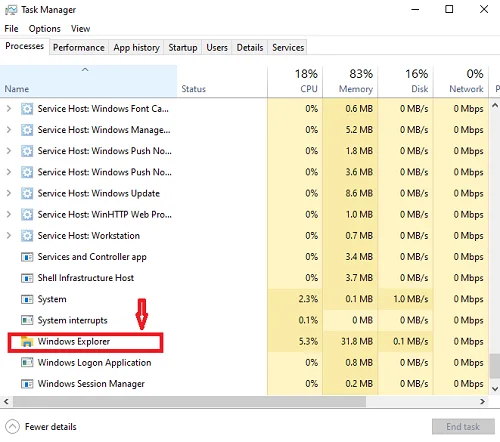
3. Select the End task from the context menu that appears.
4. Click the Task Manager’s File menu and then click Start a new task
5. Enter explorer.exe in the Create New Task window and click OK.
6. Relaunch Windows Explorer.
Check to see if the Windows 10 Action Center’s non-opening issue has been resolved.
4. Perform a Disk Cleanup
Low hard disk or memory space causes problems with the smooth operation of Windows 10, resulting in issues such as the Windows 10 Action Center not opening or closing.
As a result, performing a regular Disk Cleanup process at least once a month is always a good idea.
Disk Cleanup removes temporary files and frees up a lot of space on your hard drive. It is possible to do so by following the steps below.
1. In the Windows search bar, type Disk Cleanup.
2. From the results, launch the Disk Cleanup app.
3. From the Disk Cleanup window, select the type of files you want to delete and press OK.
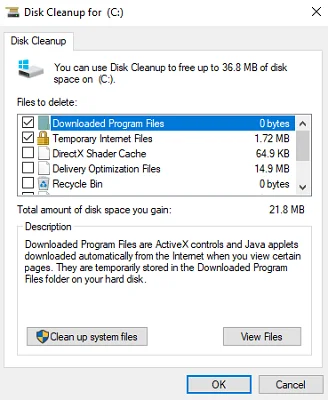
4. If you want to clean up unwanted system files, follow these steps. Return to the Disk Cleanup app and select Clean up system files.
After completing the action, the Disk Cleanup window will close automatically.
Then, restart your computer to complete the clean-up process and check to see if the Windows 10 Action Center is open.
5. Change Taskbar Settings
The fifth solution to the problem of Windows 10 Action Center not opening is to try to change the Taskbar settings.
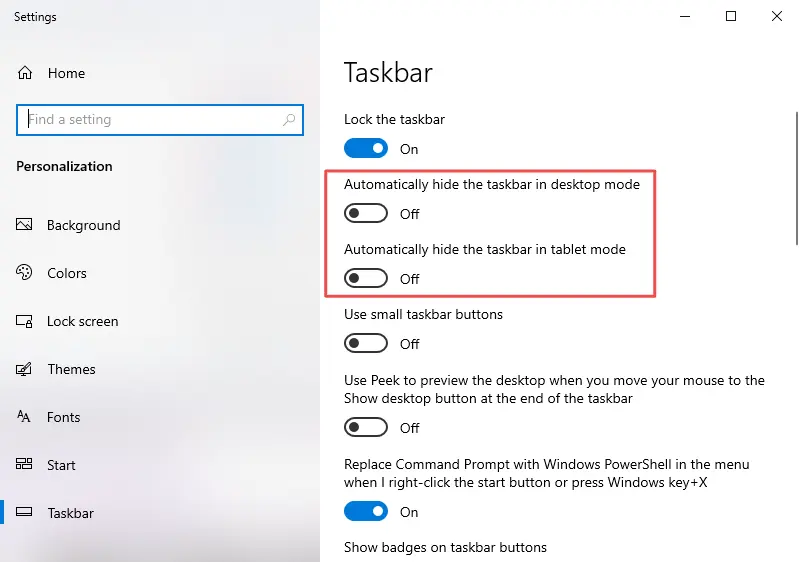
=> To proceed, right-click on the taskbar and select Taskbar settings.
=> In the pop-up window, toggle the checkboxes to Automatically hide the taskbar in desktop mode and Automatically hide the taskbar in tablet mode to On.
When it’s completed, restart your computer and see whether the problem with Windows Action Center not opening has been resolved.
6. Recreate the System File UsrClass.dat
Another cause of the Windows 10 Action Center’s inactivity is corruption in the UsrClass.dat system file.
As a result, we must restore this file by renaming the existing file. Otherwise, this file corruption may cause a variety of system problems, including system notification issues.
When we rename the existing file, Windows is forced to create a new UsrClass.dat, which in most cases resolves the notification issue.
One thing to remember is that when we rename the original file, we should not delete it. This file is required when something goes wrong during a reboot.
1. By pressing Windows Key + R, you can access the Run command box.
2. Then type %localappdata%\Microsoft\Windows and Enter.
3. In the File Explorer window, go to the View tab and check the box next to hidden items.
4. Then you’ll be able to see all of the hidden files in the window.
5. Locate the file UsrClass.dat and rename it to UsrClass.Old.dat.
6. When we rename the original UsrClass.data file, Windows creates a new one.
After renaming the file, restart the computer and check to see if the action center is operational.
Otherwise, we’ll proceed to the next option. As previously stated, do not delete the renamed file; we will need it to restore the system settings if something goes wrong.
7. Re-register Windows 10 Action Center
We are re-registering the Windows 10 Action Center using this method.
This procedure will usually solve the problem of the Action Center not opening. We’re going to run a command in Windows PowerShell in this phase.
The PowerShell command can solve the vast majority of Windows 10 issues in a quick and error-free manner.
- Search for Windows PowerShell in the search bar or press Windows Key+X and select Run as Administrator.
- Then, in the PowerShell window, type and enter the following command:
Get-AppxPackage | % { Add-AppxPackage -DisableDevelopmentMode -Register "$($_.InstallLocation)\AppxManifest.xml" -verbose }- Allow the system to run and finish. Then, restart the system to save the changes and ensure that the action center is working properly.
If you are still unlucky, proceed to the next solution.
8. Use the Registry Editor to Enable Action Center
In this case, we can use the Windows registry editor to resolve the problem with the Windows 10 Action Center not opening.
1. To open the run command window, press Windows Key+R.
2. Enter the Regedit instruction in the run command window.
3. The Registry Editor window will appear here.
4.Select HKEY CURRENT USER > Software > Policies > Microsoft > Windows > Explorer in the registry editor.
The explorer key can be found here. If it does not exist, we must create it. In addition, we’ll need to create some files for the new Explorer key.
If the Explorer key is present, proceed to the next solution.
Follow the steps below to create the Explorer key and the necessary files.
1. Select New>Key from the context menu when you right-click Windows Key.
2. Enter Explorer as the key name.
3. When you right-click on the new Explorer key, choose New > DWORD (32-bit) Value from the context menu.
4. Enter DisableNotificationCenter and press Enter when prompted for a name.
5. Double-click the DisableNotificationCenter file in the right-hand pane. When a window appears, change the Value data from one to zero to enable the Action Center. To finish, press the OK button.
Then restart the computer to ensure that the notification center is functional.
9. Use Local Group Policy Editor to Enable Windows 10 Action Center
In this case, we’ll use the Local Group Policy Editor to enable the Action Center in Windows 10.
- Open the Run command window by pressing the Windows key + R
- In the command window, type gpedit.msc and enter
- In the opened Local Group Policy Editor window, select User Configuration > Administrative Templates > Start Menu and Taskbar.
- In the right-hand pane, you will get the Remove Notifications and Action Center settings. Double-click on it.
- Here, you will get a pop-up window to select Not Configured or Disabled. Click Apply and OK. Then, Windows Action Center will be enabled.
Restart the computer, as usual, to see if the problem has been resolved.
10. Use SFC and DISM Scan Tools
The SFC and DISM commands are the most effective Windows tools for resolving the majority of Windows 10 system issues.
Both tools can be used from the command prompt. It was reported that the Windows 10 Action Center opening problem was fixed several times by running the SFC and DISM commands.
In this case, the SFC command is used to repair any corruption or missing system files, and DISM scans the system image to make the necessary corrections.
It is important to remember to run the DISM scan before the SFC scan.
- Open the command prompt by typing it into the Windows search bar.
- Enter the following command:
DISM /Online /Cleanup-Image /ScanHealth
- Wait for the scan to complete before entering the following command.
DISM /Online /Cleanup-Image /RestoreHealth
After the scan is completed, restart the computer.
Then, enter the following command to run the SFC scan.
sfc /scannow
Allow the PC to complete the SFC scan before restarting it.
11. Create a New User Account
We observed that a corrupted user profile also causes the Windows 10 Action Center not to respond.
So, in this step, we will attempt to create a new user profile. To create a new user profile, follow the steps below.
- Go to Start>Settings>Accounts.
- Choose Family and other users.
- Under Other Users, near the + icon, select Add someone else to this PC.
- Select I don’t have this person’s sign-in information from the opened windows.
- To provide the necessary permissions, click Add a user without a Microsoft account and enter a new account name.
- Then enter the new account’s username and password.
- Restart the computer and sign in using the new credentials.
- Check to see if the Action Center is up and running.
Related: How to Address [pii_email_a427253221614b6547d5] Error Code in Outlook Mail?
Conclusion
We are confident that one of the methods described in this article will resolve your Windows Action Center issue.
If so, please describe your issue and the solution that worked for you. If you discovered another solution that helped you in this situation, please share your findings here. It will undoubtedly benefit the other readers.
We hope you found this article helpful, and do like and follow us on Facebook and Twitter for regular updates.
Sign up for our free newsletter as well to receive fresh information right in your inbox and stay informed technically.
You May Be Interested to Read:
- Why Is “Your Location Is Currently in Use” Displayed on Windows?
- How to Address [pii_email_a427253221614b6547d5] Error Code in Outlook Mail?
- Fixing the Windows Unexpected Kernel Mode Trap Error in 15 Easy Steps
- 6 Simple [Solved] Fixes for the Kernel Mode Heap Corruption Error on Windows 10
- How to Automatically Lock Your PC Using Dynamic Lock in Windows?


