
How to Resolve the DISM Error 1910 in Windows 10?
Certain Windows users receive the DISM error 1910 code when running a DISM scan.
When we run the “DISM /Online /Cleanup-Image /RestoreHealth” command on a Windows 10 computer and attempt to repair the Windows image, we may receive the DISM error 1910: “The object exporter specified was not found.”
Most of the time, this issue is discovered in the scan logs file rather than at the end of the operation. This DISM error 1910 has been observed in versions of Windows 7, Windows 8.1, and Windows 10.
This guide will show you how to resolve the 1910 (The object exporter specified was not found) error when using the DISM command on Windows 10.
If you are still using genuine versions of Windows 7 or 8, you are encouraged to upgrade to Windows 10 for free.
Related: How to Resolve the Windows 10 System Service Exception Error?
Why Does the DISM Error 1910 Occur?
Following a thorough investigation, it was discovered that this error code could be caused by a variety of different circumstances. Here’s a list of potential suspects:
1. According to several concerned users, this problem may occur if the DISM tool (Deployment Image Servicing and Management tool) is not working properly. Sometimes the DISM utility is corrupted due to system file corruption
2. If the problem arises after installing a new Windows update, a driver update, or third-party software installation, you may be able to use the System Restore feature to restore your system to a previous state when the problem did not exist.
3. In certain situations, you may discover that this issue is caused by corruption in your operating system’s multiple files.
How to Fix DISM 1910 Error?
Now that you’ve narrowed down every probable source of the problem. As a result, the remedy is solely dependent on the cause of the issue.
If the problem is caused by a DISM tool error, we may resolve it by executing an SFC command. An SFC scan may be able to repair it when the DISM utility is corrupted due to system file corruption.
If the error arises as a result of upgrading Windows, any drivers, or any software, a system restore instance will resolve the issue.
If neither method works, we can try a Windows reset, Windows repair, or a clean reinstallation of Windows 10.
Resetting every Windows component using methods such as resetting, repair installation, and clean installation may be able to resolve the issue.
However, we are unable to determine the precise cause of the issue from the Windows log file. As a result, it is only prudent to implement the solutions one at a time.
Here is a list of ways that other DISM users who have experienced error 1910 have found to be effective:
1. Confirm the Error
Before attempting to resolve DISM Error 1910, you must first determine whether the problem is recurring.
To confirm, right-click on the Start menu icon and choose Windows PowerShell (Admin).
You may also execute all of the commands listed below on the Command Prompt window by searching for cmd in the Windows search bar and running it as an administrator.
After typing the following command, press Enter.:
DISM /Online /Cleanup-Image /StartComponentCleanup
If you get the message “Error: 2, The system cannot find the file specified,” it implies that the system is unable to locate the file.
Following the execution of the above command, you should proceed with the following solution approaches.
2. Performing an SFC Scan
If you see this error when doing a DISM scan, you may be able to address the damaged dependence by scanning your system files using a System File Checker (SFC).
Some impacted customers reported that using this type of scan allowed them to restore every instance of a damaged system file – and that the DISM scan did not return the same 1910 error thereafter.
If you haven’t already, do an SFC scan to resolve the 1910 DISM issue by following the instructions below:
To open the Run dialogue box, hit the Windows key + R.
Then, in an elevated Command Prompt, type ‘cmd’ in the text box.
When the UAC (User Account Control) box displays, click Yes to provide admin access.
You may also access the command prompt using the Windows search bar.
To do an SFC scan, open a command prompt window and type the following command.
sfc /scannow
Once you’ve begun this procedure, be patient and wait until the SFC scan is finished.
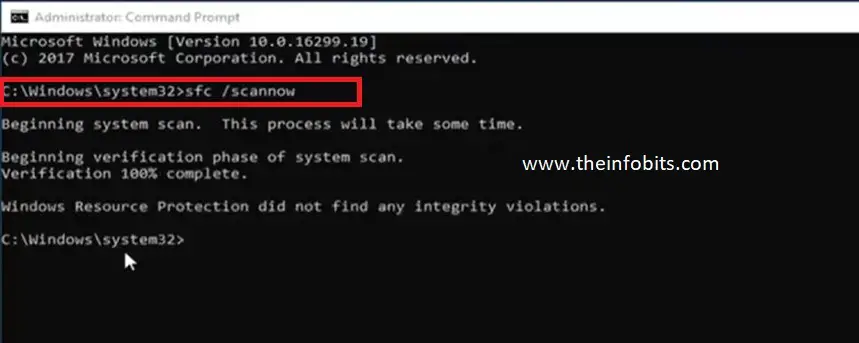
Closing this window or stopping the process before it is completed may result in logical inconsistencies in your system, which may result in additional problems.
After the operation is completed, you may securely close the command prompt window and restart your computer.
Start a fresh DISM scan by typing the following command into the prompt, and check whether you still receive the DISM 1910 error.
DISM /Online /Cleanup-Image /RestoreHealth
If the problem persists, proceed to the next possible solution listed below.
3. Performing a System Restore
If this problem arose as a result of a recent system update (a new Windows Update, a new application installation, a new driver installation or update, etc. ), you should be able to repair it by using the System Restore feature to restore your machine to a prior state where this problem did not exist.
The majority of the time, this issue is caused by a discrepancy brought about by a recent Windows Update.
System Restore generally takes a system snapshot of Windows before running critical updates or installing critical apps.
Several individuals have said that System Restore assisted them in resolving the issue; therefore, we recommend that you try it.
However, keep in mind that using a System Restore snapshot essentially restores your system to an earlier point in time. As a result, every installed application, driver, and Windows update will be undone.
If you do a System Restore, any programs and software installed after the specified time of the restore point will be immediately removed. However, the change will not affect your files or folders.
This method, however, is only applicable to users who have created restore points in their operating systems. If it hasn’t, proceed to the next method of troubleshooting listed below.
If you understand how the System Restore software works and want to proceed with this operation, follow the instructions below to begin a System Restore procedure.
- In the Windows 10 search box, type System Restore.
- Open the ‘Create restore point‘ option
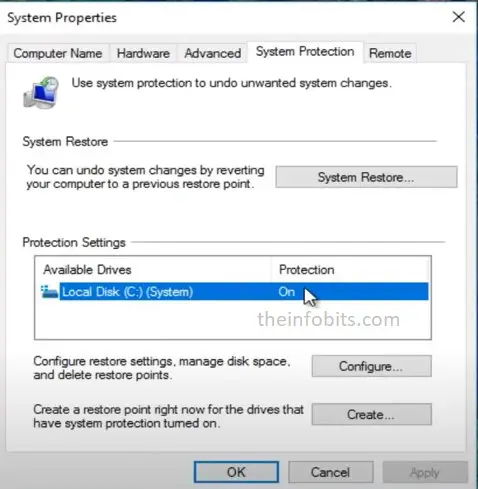
- Then you will get a System Properties window
- Navigate to Protection Settings and then to the System Restore tab beneath it in the System Properties box.
- On the next step, click Next, and then choose a restore point when the ‘DISM Error 1910′ was not present.
- To finish the procedure, click Next and then follow the on-screen instructions.
If you find and successfully use a compatible system restoration snapshot, restart your computer to see if the DISM problem has been repaired.
If you can’t find a working system restore point, proceed to the next step below.
4. Performing a Repair / Clean Installation
If none of the above-mentioned solutions have worked for you, you can try refreshing every OS element to ensure that no corrupted system files are causing the DISM problem.
The most elegant method for achieving this is to use a repair installation.
You can also attempt the Windows 10 reset feature on your PC before proceeding with the repair process. It aided several users in resolving the DISM error 1910.
However, keep in mind that to do an in-place repair, you will need to input proper installation media.
It is simple to construct a bootable Windows 10 USB stick. Simply go to Microsoft’s official website and download the media creation tool.
To obtain Windows 10 installation media, use the creation tool and follow the suggested steps.
Allow your PC to boot from the installation media after creating the bootable drive.
Then, from the opening window, choose “Repair your computer.” Then, select “Troubleshoot” and follow the on-screen instructions.
This is a time-consuming process, but it will allow you to finish the operation without losing any data on the operating system drive.
This means you’ll be able to keep all of your data, games, applications, and even specific user preferences.
You may also do a clean install, which is a simpler procedure that can be initiated directly from the Windows 10 installation GUI by booting the PC from the proper installation disc.
The main disadvantage is that you will lose all of your data that is currently saved on the hard disc unless you first back it up.
Conclusion
This brings us to the end of our guide on how to fix the DISM Problem 1910 problem code on Windows 10.
We made every effort to walk you through each step in detail, and we hope that one of the options listed above worked for you.
Please let us know in the comments section below if you have any queries about the procedures!
We hope you found this article helpful, and do like and follow us on Facebook and Twitter for regular updates.
Sign up for our free newsletter as well to receive fresh information right in your inbox and stay informed technically.
You May Be Interested to Read:
- Why Is “Your Location Is Currently in Use” Displayed on Windows?
- How to Address [pii_email_a427253221614b6547d5] Error Code in Outlook Mail?
- Why Does the Mic Keep Cutting Out in Windows 10? [Simple Fixes]
- Fixing the Windows Unexpected Kernel Mode Trap Error in 15 Easy Steps
- Easy Fix for Windows 10 Action Center Not Opening Problem


