
Simple Fixes for the Kernel Mode Heap Corruption Error on Windows
You’ve probably seen a bluescreen of death (BSOD) if you’ve been using Windows for a long time.
The KERNEL_MODE_HEAP_CORRUPTION issue produces a BSOD due to its critical nature.
The Kernel Mode Heap Corruption is a serious problem that compromises the stability and performance of Windows operating systems.
Don’t worry; you’re not alone. This is a pretty classic error, and it’s usually not difficult to solve.
Many causes might contribute to the problem, including outdated or defective drivers, memory leaks, and hardware failures.
In this post, we explore the complexities of kernel-mode heap corruption in Windows, investigating the consequences, diagnosis approaches, preventative best practices, and successful resolution solutions.
What Is Kernel Mode Heap Corruption?
Kernel-mode heap corruption is a blue screen of death that causes your computer to become unresponsive.
It indicates a problem or conflict with the system kernel, which might be caused by a software or hardware malfunction.
It happens when the memory allocated to kernel-mode processes is corrupted, resulting in system crashes, application problems, and even possible security vulnerabilities.
System administrators, software developers, and IT professionals must understand the origins, symptoms, and effective solutions for Kernel Mode Heap Corruption.
When you receive a Kernel Heap Corruption BSOD problem, the stop code shown by Windows is Kernel_Mode_Heap_Corruption.
It, like other codes, is intended to help users resolve issues that cause system crashes.
The most typical reasons for the error are driver errors (especially graphics card drivers) or application incompatibilities; however, they can also be caused by hardware malfunctions.
Kernel-mode heap Corruption has been seen in several circumstances.
Some said the problem happened when Windows 10 booted up, while others claimed it occurred when particular apps, such as video games, were launched.
Related: Fixing the Windows Unexpected Kernel Mode Trap Error in 15 Easy Steps
What Causes Kernel-mode_heap_corruption?
Here are a few problematic scenarios that might result in the Kernel_mode_heap_corruption stop code.
- Device drivers that are incompatible or outdated
- Corruption of the hard drive or the operating system
- System upgrades that aren’t working
- Applications that aren’t supported or are incompatible
- Devices with new hardware
- Problems with Windows RAM
- Overclocking
- BIOS that is out of date or incorrectly set
- The GPU card was not inserted correctly
- Infection with malware
- Inadequate disc space
How to Fix the ‘Kernel Mode Heap Corruption’ Error?
The Kernel Mode Heap Corruption bluescreen problem on Windows 10 may be resolved by following the methods below.
So, before you call a computer expert, why not try one of the following methods to address the problem on your own?
You don’t have to try them all; simply work your way down the list until you find one that works for you.
1. Update or Roll Back Drivers
This ‘blue screen of death (BSOD)’ issue has been reported by some Windows users immediately after updating their drivers, particularly graphics card drivers, or after installing a Windows update.
The most common cause of the stop code Kernel Mode Heap Corruption is a driver issue.
This might be due to out-of-date or faulty updated drivers. Fortunately, Windows has a Device Manager that allows users to manage all drivers.
Update Windows 10 Drivers
Although Windows automatically downloads and installs the newest drivers, this may not be the case if you are on a metered connection or have disabled Windows Update.
If you’re not sure, check to see if all of your device drivers (including graphics card drivers) are up to date.
Users may manually verify and update drivers in Windows Device Manager one at a time.
If you don’t have the time, patience, or computer skills to manually update your device drivers, there is plenty of software available that will do it for you, such as Driver Easy.
Let us see how we can perform Windows driver updates manually.
- Open the Run command by pressing Windows Key + R.
- In the text box, type devmgmt.msc and click Enter.
- Navigate to the necessary device in the Device Manager and expand the options.
- Now, right-click on a device and select Update driver from the context menu.
- Select Automatically search for updated driver software, and Windows will download the driver for you.
- Your computer should be rebooted after this.
While the Microsoft catalog usually has the most recent drivers, it is always a good idea to double-check the driver on the manufacturer’s website.
If the driver versions do not match, users can download the most recent driver from the website.
Steps one to four from the previous section should be followed.
- Click Browse my computer for driver software on the update screen.
- Click Next when you’ve found the driver you’ve downloaded.
Allow Windows to install the driver before rebooting.
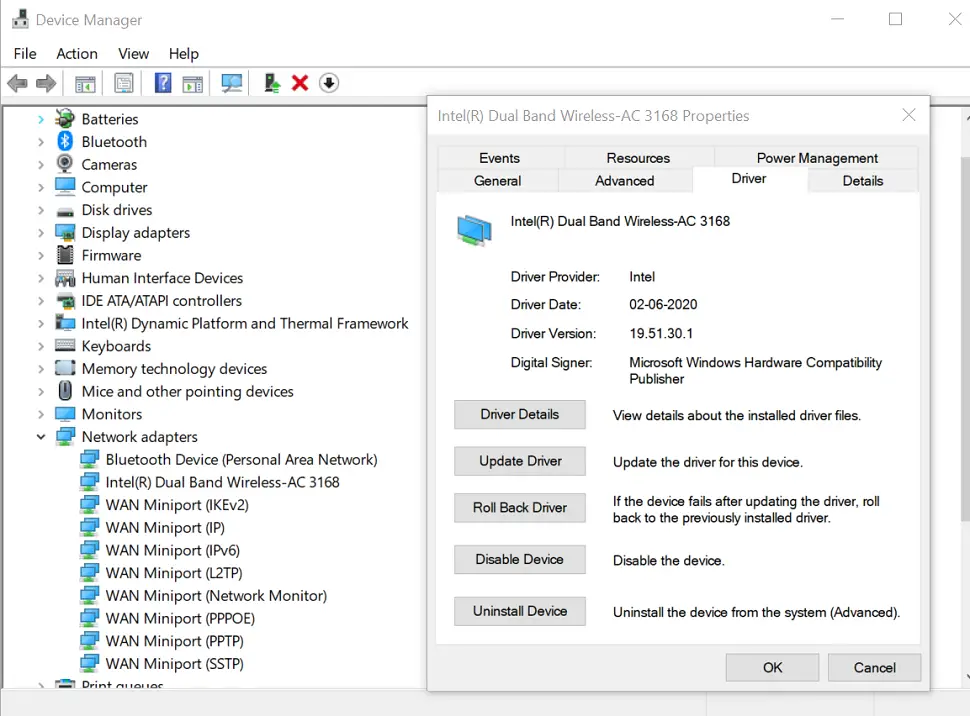
Roll Back Windows 10 Drivers
An updated driver may occasionally be unstable, resulting in a blue screen. Fortunately, in case something goes wrong, Windows keeps a backup of the previous driver version.
Here’s how to roll back drivers on Windows 10.
In most situations, video cards or graphics upgrades are to blame for this issue. As a result, you should roll back your video driver to a previous version to ensure the stability of your hardware device.
Here’s how you do it:
- Open the Run dialogue box by entering Windows Key + R and typing devmgmt.msc.
- Locate the chosen device in the Device Manager and expand the options.
- Right-click the necessary driver and select Properties from the drop-down menu.
- Select Roll Back Driver from the Driver tab.
Windows will automatically restore the previous driver version.
When you restore your video driver to a previous version, see if the ‘Kernel Heap Corruption’ problem persists.
If this happens, try the next solution, which is mentioned below.
2. Repair System Files That Have Been Corrupted
System files may be corrupted while writing data to a disc during updates or a power loss. Corrupt system files are sometimes the blame for this blue-screen problem.
DISM and SFC are two of Windows’ most important tools for dealing with this issue.
DISM (Deployment Image Servicing and Management) is one of the most effective Windows diagnostic tools.
Although you shouldn’t need to use the tools very often, this is the one to use if you’re experiencing a high number of crashes, freezes, or problems.
DISM locates and fixes damaged files in the component store of a Windows system image. It can detect damaged files in your Windows system and fix them on its own.
SFC (System File Checker) is another Windows tool that checks and repairs system files. When SFC detects that a file has been damaged or altered, it replaces it with the correct version.
SFC will do a full check of your system and repair or replace any damaged or missing files using versions from the Windows component store.
Repair System Image Using DISM
DISM is a disc image repair utility that comes with Windows. Users should use DISM before SFC for a more comprehensive and successful repair process.
- Type cmd into the Start menu search bar, then right-click Command Prompt and select Run as administrator.
- Type the command below into the terminal and hit Enter.
Dism /Online /Cleanup-image /Scanhealth
Then type the next command shown below and enter.
Dism /Online /Cleanup-image /Restorehealth
The DISM utility will then start checking for problems and attempting to fix them.
Allow Windows to complete the process. Restart your machine to see if the Kernel Heap Corruption error returns.
If it happens again, try the next solution listed below.
Repair System Files Using SFC
SFC is an abbreviation for System File Checker, and it is in charge of identifying and repairing corrupt system files. It is not only efficient but also simple to use.
- Type cmd into the Start menu search bar, then right-click Command Prompt and select Run as administrator.
- Type the following command into the terminal and enter.
sfc /scannow
After that, the SFC tool will begin checking all system files and repairing those that are damaged or missing.
Before restarting your computer, wait for the process to complete.
3. Perform a Clean Boot to Resolve a Software Conflict
Windows 10 Kernel Mode Heap Corruption problem might potentially be caused by a software conflict. This is especially likely if the problem occurs after installing new software or attempting to run a specific program, such as a video game.
There is no simple way to determine whether programs are incompatible.
You must terminate any undesirable apps (including any associated background processes) and wait for the problem to recur.
A clean boot is an excellent way to determine what’s wrong with your computer. It starts the computer with all third-party programs disabled.
Using this approach, you may narrow down the possible chances of finding out the software behind the Kernel Mode Heap Corruption blue screen.
Clean Boot Your PC
- Open the Run command by pressing Windows Key + R.
- Enter the command msconfig.
- Go to the Services tab in the System Configuration window.
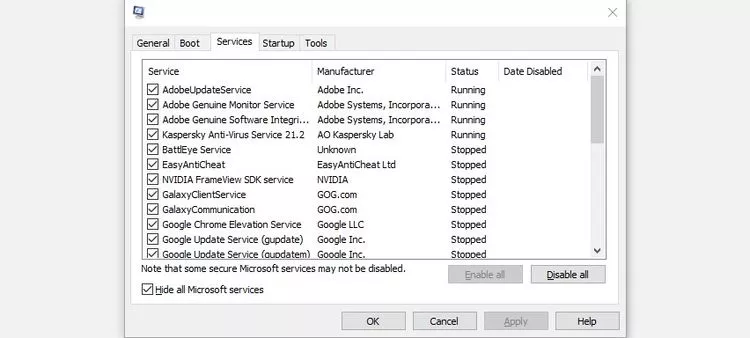
- Check the Hide all Microsoft services option under the Service tab.
- Now, select all of the services displayed in the window and disable them all by clicking Disable All.
- Close System Configuration after applying the changes.
- Open the Task Manager by inputting CTRL + Shift + ESC.
- Select the Startup tab from the drop-down menu.
- Disable each program by clicking on it.
- Click OK and reboot your computer.
When your computer boots up, all third-party apps will be disabled.
Use your computer as you usually would. Whether a previous action prompted the blue screen to appear, do it again to determine if it is the source of the problem.
Note: If you shut down essential system applications by accident, you could end up with even more difficulties. Consult a professional or look for information about the software before proceeding.
Wait to see if the issue reappears. If it happens again, proceed to the next repair step.
Otherwise, we must conclude that the problem was most likely caused by one or more of the programs you disabled. You must now discover which program(s) caused the issue.
Determine Which Program(s) Are Causing Problems.
If terminating all unnecessary applications prevented the error from recurring, you knew that one of them was the root of the issue. All you have to do now is figure out which one it is.
To do so, restart one of your programs and check if the problem repeats. If it still doesn’t work, restart the program one by one while waiting for the error to occur.
When the error occurs again, you know it’s due to a problem with the application you just restarted. However, keep in mind that this may not be the only issue.
It might be a clash with another application — one you restarted earlier – that’s causing the problem.
If you don’t need the troublesome program, just disable or uninstall it as soon as feasible, as explained below.
Check to see whether the issue software is incompatible with anything else (in which case, you may be able to disable/uninstall the other program instead).
To accomplish this, keep the troublesome software running while closing all other apps. If the problem recurs, you’ll know it’s due to the program.
If the problem does not recur, you may be certain that the program is incompatible with another. To determine which one it is, restart each program one at a time until the error occurs again.
When you’ve determined which applications are incompatible, disable or delete those you don’t require.
You have three options once you’ve identified the program(s) that are creating the conflict:
- Set the program’s priority to low: If you don’t want to deactivate or uninstall the troublesome program, you might try de-prioritizing it first. This has solved the problem for some people. It is possible to accomplish this by launching the Task Manager.
- Disable the program: If the software is also one of the startup items, use Task Manager to disable it on startup.
- Uninstall the program: In Programs and Features, right-click the application you want to delete and select Uninstall.
If the issue remains after de-prioritizing, deactivating, or removing conflicting apps, go to the next remedy listed below.
4. Look for Problems with the Hardware
Check that everything is operating correctly if you recently upgraded your computer hardware.
A defective RAM module might be the source of the problem. As a consequence, it’s a good idea to run a memory test.
The Windows Memory Diagnostic program can help you discover and resolve common PC memory problems.
How to Use the Memory Diagnostic Tool in Windows
System memory issues affect both the operating system and any executing programs.
In certain cases, they can also cause blue screen errors due to kernel-mode heap corruption. However, using Windows Memory Diagnostic, a handy tool provided by the operating system, you can rapidly check your RAM and rectify any errors.
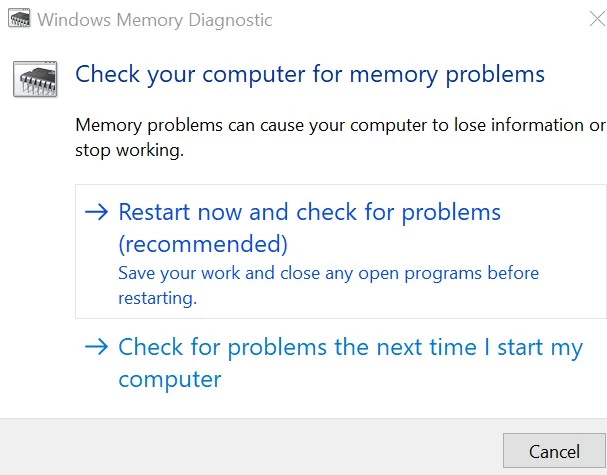
Here’s how you can utilize it:
- Open the Run command by pressing Windows Key + R.
- Press Enter after typing mdsched.exe.
- Restart now and check for problems (recommended) in the Windows Memory Diagnostic box.
- Allow Windows to finish detecting and correcting memory issues.
If you don’t see any errors here, your computer’s RAM is in good operating order. Otherwise, you should replace your RAM or consult with a hardware provider.
Other Solutions to Consider
- Ensure that all hardware is correctly installed. It’s a good idea to double-check that all freshly installed components are securely fastened.
- Look for any components that are overheating.
- When utilizing two RAM sticks, try swapping slots.
- Change from dual-channel to single-channel memory or vice versa.
5. Overclocking Should Be Disabled
Overclocking tools are used by gamers to get more power out of their hardware and improve their gaming performance.
However, if done incorrectly and without the use of a cooling system, your computer will begin to display blue screen difficulties to protect itself from overheating.
To resolve this issue, you may either increase the size of your cooler, double-check your overclocking settings, or turn off overclocking completely. The last option is the most secure.
If you installed a third-party overclocking tool, ensure that it is switched off and that the clock settings have returned to normal. If required, overclocking may be disabled in the BIOS.
6. Reset or Reinstall Windows
If none of the above-mentioned methods work, your Windows operating system may need to be reset or reinstalled.
Resetting Windows will return your system to its original state as if you had turned it on for the first time.
It removes any programs that did not come with your computer, but you may select whether or not to keep your data.
Furthermore, you will not require any external boot devices to perform the reset because Windows will handle everything.
A clean Windows installation will erase everything from the disc on which your system is installed (including all your installed programs and personal data).
You’ll need an external boot device, such as a USB drive, to perform the clean install. Although a clean install looks to be more difficult than a reset, it has a bigger impact.
Final Thoughts
The Kernel Mode Heap Corruption blue screen error may look terrifying and intimidate consumers, yet such crashes occur more frequently than you may think.
Running the above-mentioned diagnostic utilities will generally resolve the issue.
However, before making any of these modifications, create a system restore point. It’s a good idea to have Windows create one for you daily.
Frequently Asked Questions
What is the reason for kernel-mode heap corruption?
Kernel Mode Heap Corruption can be caused by several factors, including software flaws, memory leaks, improper memory management, malfunctioning device drivers, and incompatible or obsolete software components. Malware or system hardware faults might potentially cause it.
Is it possible to avoid Kernel Mode Heap Corruption?
It is feasible to prevent kernel-mode heap corruption to some extent, but it is not always possible to eliminate the risk. Several preventative steps can considerably lessen the risk of encountering this problem. Using securely coded, established software, conducting frequent driver updates, providing correct error handling, and regularly updating Windows and application software
How can I fix Kernel Mode Heap Corruption?
Repairing Kernel Mode Heap Corruption entails determining the fundamental cause of the problem and implementing relevant fixes. This may entail upgrading device drivers, implementing software patches, doing system integrity checks, and employing memory debugging tools. In more complicated circumstances, contacting skilled IT experts or Microsoft help may be essential.
This article should have helped you solve your Windows 10 Kernel Mode Heap Corruption problem. If you have any more questions or comments, please post them in the comments section below.
We’d be glad to help you. Thank you so much for taking the time to read this!
Do like and follow us on Facebook and Twitter for regular updates. In addition, we ask that you bookmark this page for future reference.
Sign up for our free newsletter as well to receive fresh information right in your inbox and stay informed technically.
You May Be Interested to Read:
- How to Fix the “Wi-Fi Doesn’t Have a Valid IP Configuration” Error?
- How to Resolve the Windows 10 System_Service_Exception Error?
- How to Fix an Unmountable Boot Volume Error in Windows 10 or 11?
- How to Resolve the DISM Error 1910 in Windows 10?
- Fixing the Windows Unexpected Kernel Mode Trap Error in 15 Easy Steps


