What Is TPM 2.0? How to Check, Enable & Fix It for Windows 11
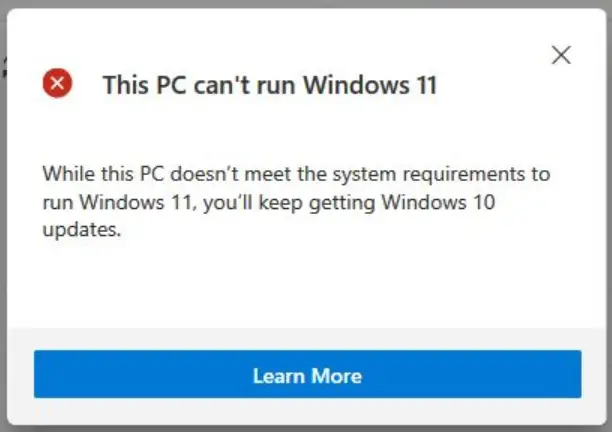
If you’ve tried to install or upgrade to Windows 11 and hit the message “This PC can’t run Windows 11,” there’s a good chance TPM is the reason. It’s one of the most confusing system requirements Microsoft has ever introduced. Most people have never heard of it, yet it’s now a hard requirement for one of the world’s most-installed operating systems.
The main part is that TPM 2.0 is built into almost every PC made since 2016. It’s usually just switched off in the BIOS by default, and turning it on takes about two minutes once you know where to look.
This guide covers what TPM actually is, how to check which version you have, how to enable it on any motherboard brand, and what to do if Windows still won’t detect it after you’ve turned it on.
Quick Answer:
TPM (Trusted Platform Module) is a small security chip, or firmware equivalent, built into your motherboard or CPU that generates and stores encryption keys. Windows 11 requires TPM 2.0 to install. Check your version by pressing Win + R, typing
tpm.msc, and pressing Enter. If it’s missing or disabled, restart into your BIOS/UEFI settings, find TPM, PTT (Intel), or fTPM (AMD) under the Security or Advanced tab, set it to Enabled, then save and exit. Most PCs built since 2016 support it; if yours doesn’t, no BIOS setting will add it.
What Is TPM?
TPM stands for Trusted Platform Module. It’s a hardware-based security standard, built either as a small dedicated chip soldered to your motherboard or as a firmware function running inside your CPU, that handles the most sensitive part of your PC’s security: generating and safeguarding encryption keys.
Think of it as a tiny, tamper-resistant vault that lives separately from your regular hard drive or SSD. Instead of storing your encryption keys as regular files that malware or a thief with physical access could copy off the drive, TPM keeps a critical portion of each key locked inside dedicated hardware that’s built to resist extraction.
Even if someone removes your storage drive entirely and connects it to another PC, they still can’t unlock TPM-protected data without the original chip.
TPM comes in two forms on modern PCs:
- Discrete TPM (dTPM): A separate physical chip on the motherboard, common on older or higher-end systems.
- Firmware TPM (fTPM/PTT): TPM functionality built directly into the CPU’s firmware rather than a standalone chip. This is what most consumer PCs made in the last several years actually use. Intel calls its version PTT (Platform Trust Technology); AMD calls its version fTPM.
There’s no meaningful security difference between the two for typical home or office use. Windows treats them identically once enabled.
Microsoft requires TPM 2.0 (not the older TPM 1.2) for Windows 11, and it underpins several of the OS’s core security features: BitLocker drive encryption, Windows Hello facial recognition and PIN login, Secure Boot validation, and Credential Guard in business environments.
How Does TPM Actually Work?
TPM’s core job is generating and storing cryptographic keys. But critically, it never exposes the private portion of those keys to the rest of the system. When an application needs to encrypt or decrypt something using a TPM-backed key, it sends the request to the chip, and the chip performs the operation internally and returns only the result.
The private key itself never travels across the motherboard where it could be intercepted.
Each TPM chip is also assigned a unique identity during manufacturing, which lets it verify that hardware hasn’t been swapped or tampered with. Before your PC finishes booting, TPM can check that the bootloader hasn’t been modified since the last successful startup, a process Microsoft calls measured boot. If it detects unauthorized changes, it can block the untrusted code from running.
To actually use these features, a TPM needs to be initialized and “owned,” which in practice means Windows takes care of this automatically the first time you enable BitLocker, Windows Hello, or a similar feature; you won’t typically do this manually.
Why Does Windows 11 Require TPM 2.0?
Microsoft’s stated reasoning is that TPM 2.0, combined with Secure Boot, meaningfully raises the bar against a specific and growing category of attacks: malware that infects a PC below the operating system level, in the bootloader or firmware itself, where traditional antivirus software often can’t see it.
Ransomware and credential-theft attacks increasingly target this layer because it runs before Windows Defender or any third-party security tool has a chance to load.
By making hardware-backed key storage and boot verification a baseline requirement rather than an optional feature, Microsoft is aiming to close off an entire class of attack for the whole Windows 11 install base, not just for security-conscious users who’d enable it manually.
Real Advantages of Having TPM Enabled
Beyond satisfying the Windows 11 requirement, an enabled TPM chip provides tangible, everyday security benefits:
Bootloader protection against rootkits. Advanced malware can rewrite your bootloader before any antivirus software even loads, sometimes virtualizing the entire OS underneath you to spy on activity undetected. TPM verifies the bootloader is untouched before allowing Early Launch Anti-Malware to run, and it refuses to continue booting if it detects tampering.
Stronger data encryption. BitLocker uses TPM to store its encryption keys in hardware rather than software, which means the keys aren’t accessible just by pulling the drive and reading it on another machine.
Secure credential storage. Passwords, certificates, and login tokens used for services like Windows Hello can be stored inside the TPM rather than in ordinary system files, making them far harder to extract even with local access to the PC.
Simplified multi-factor authentication. TPM makes it easier to layer in fingerprint readers, PINs, or hardware security keys without managing separate encryption infrastructure for each one.
Tamper detection. If TPM detects that its own integrity has been compromised, it can lock itself into a restricted state, which gives you (or your IT team) a clear signal that something needs investigating before continuing normal use.
For most home users, the practical takeaway is simple: enabling TPM makes BitLocker and Windows Hello meaningfully more secure, and it’s required for Windows 11 regardless.
How to Check If You Have TPM 2.0
There are three built-in ways to check, from fastest to most detailed.
Method 1: TPM Management Console (Fastest)
- Press Windows key + R to open Run.
- Type
tpm.mscand press Enter. - If TPM is present and enabled, you’ll see a TPM Management on Local Computer window showing the manufacturer, version, and status.
- Look specifically for Specification Version: 2.0. TPM 1.2 will show a different version number and won’t satisfy Windows 11’s requirement.
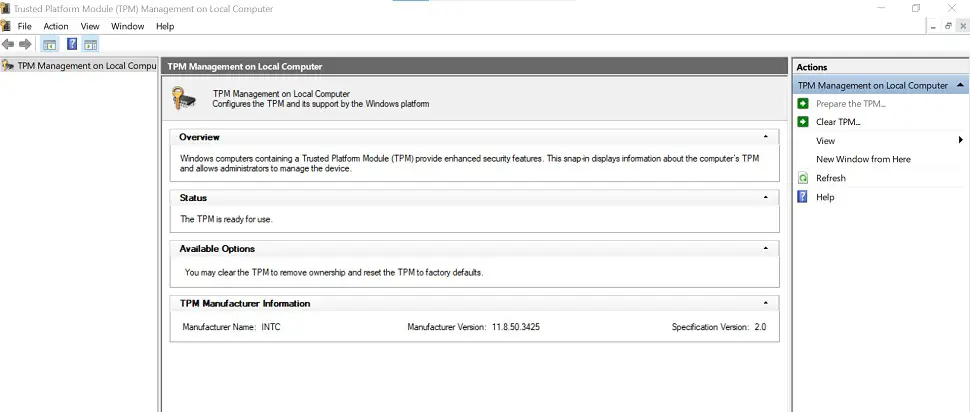
If instead you see “Compatible TPM cannot be found,” it means TPM is either not present on your hardware or, far more commonly, simply disabled in BIOS. The next section covers how to check which.
Method 2: Windows Security App
- Open Start, search for Windows Security, and open it.
- Click Device security.
- Click Security processor details.
- Confirm the Specification version reads 2.0.
If the “Security processor” section is missing entirely from Device Security, that’s another sign TPM is disabled in firmware rather than genuinely absent.
Method 3: Device Manager
- Right-click the Start button and select Device Manager.
- Expand Security devices.
- If TPM is enabled, you’ll see an entry like Trusted Platform Module 2.0.
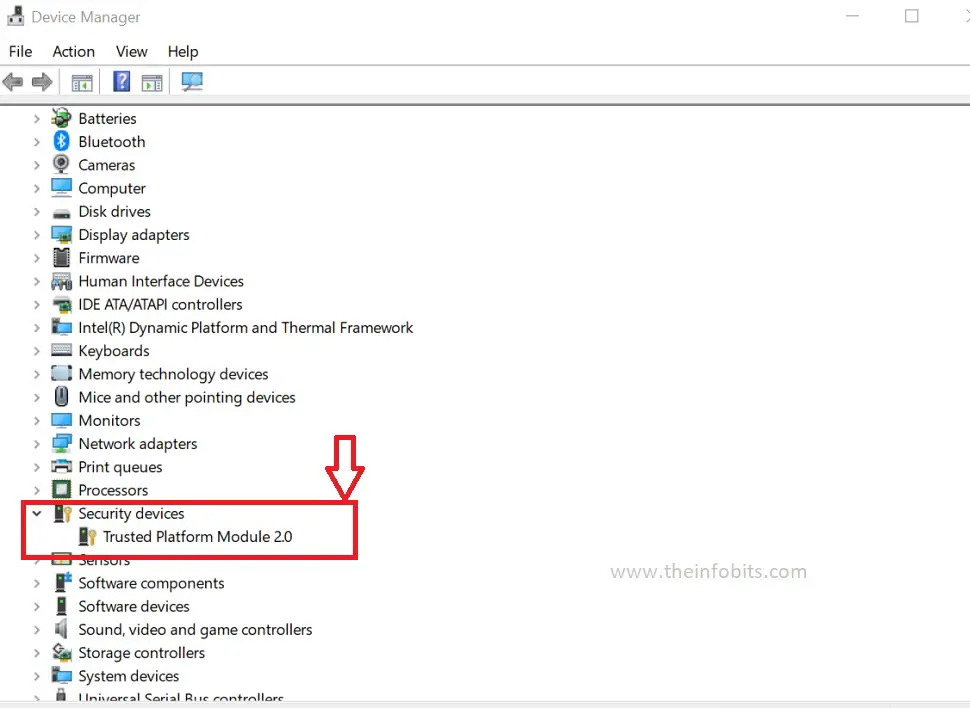
If Security devices doesn’t appear as a category at all in Device Manager, TPM is currently disabled or hidden from the OS.
How to Enable TPM 2.0 in BIOS/UEFI
Because BIOS layouts vary by motherboard manufacturer, there’s no single universal menu path. But the general process is identical everywhere. Here’s the general procedure, followed by manufacturer-specific menu names.
General Steps
- Restart your PC and enter BIOS/UEFI setup by pressing the key shown during startup; commonly Del, F2, F10, or Esc, depending on your motherboard or laptop brand.
- Switch to Advanced Mode if your BIOS opens in a simplified view (look for an “Advanced Mode” or “F7” prompt).
- Navigate to the Security or Advanced tab.
- Find the setting labeled TPM, PTT, fTPM, or Security Device Support – exact wording depends on your CPU and motherboard, covered below.
- Set it to Enabled.
- Press the save-and-exit key (usually F10), confirm, and let the PC restart.
- Once back in Windows, re-run
tpm.mscto confirm it now shows Specification Version 2.0.
Where to Look, by Manufacturer and Platform
TPM 2.0 rarely appears labeled exactly as “TPM”. It hides under different names depending on your CPU brand and motherboard maker. Look for:
- Intel systems: Intel PTT or Platform Trust Technology, usually under Advanced → PCH-FW Configuration, or Security → Trusted Computing.
- AMD systems: AMD fTPM switch or AMD CPU fTPM, usually under Advanced → CPU Configuration, or Security → Trusted Computing.
- ASUS boards: Advanced → PCH-FW Configuration (Intel) or Advanced → AMD fTPM configuration.
- MSI boards: Settings → Security → Trusted Computing → Security Device Support (older BIOS versions may list this under a “Click BIOS” security menu).
- Gigabyte boards: Settings → Miscellaneous, or Peripherals → Trusted Computing.
- ASRock boards: Advanced → Trusted Computing → Security Device Support.
- Dell/HP/Lenovo laptops and pre-builts: Security tab → TPM Security or PTT/fTPM toggle. OEM systems typically expose this with clearer labeling than DIY-built motherboards.
If you genuinely can’t locate the option anywhere, check your specific motherboard model’s manual on the manufacturer’s support site. BIOS revisions change menu layouts often enough that screenshots from a general guide can go stale within a year or two.
Enabling TPM from Within Windows (No BIOS Restart Required)
If your PC is already running Windows and you’d rather not manually navigate BIOS menus, you can jump directly into UEFI firmware settings from inside Windows:
- Open Settings → System → Recovery (Windows 11) or Settings → Update & Security → Recovery (Windows 10).
- Under Advanced startup, click Restart now.
- Once the PC reboots into the recovery menu, select Troubleshoot → Advanced options → UEFI Firmware Settings → Restart.
- This takes you directly into the BIOS, where you can follow the same steps above to enable TPM/PTT/fTPM.
This method is worth using specifically because it guarantees your PC reboots into UEFI firmware settings rather than the plain BIOS/legacy screen some systems default to, which is where the TPM option actually lives on UEFI-based machines.
Upgrading From TPM 1.2 to TPM 2.0
If tpm.msc shows you have TPM present but running version 1.2, whether you can upgrade depends entirely on your hardware:
- Discrete TPM 1.2 chips on older motherboards generally cannot be upgraded to 2.0 through software. The chip itself only supports the older specification. Your only options are a firmware update from the manufacturer (rare, and only offered on select business/enterprise hardware) or replacing the physical module if your board has a compatible TPM header.
- Firmware TPM (fTPM/PTT) on CPUs from roughly 2015 onward almost always supports 2.0 natively. If
tpm.mscshows 1.2 on a system using firmware TPM, a BIOS update from your motherboard manufacturer is usually what’s needed, since the firmware TPM version is tied to BIOS firmware revisions rather than the CPU itself.
Check your motherboard manufacturer’s support page for the latest BIOS version before assuming a hardware upgrade is your only path. This is a commonly missed step that solves the problem for free.
Troubleshooting: TPM Enabled but Windows Still Won’t Detect It
Occasionally you’ll enable TPM in BIOS, save your changes, and Windows still reports it as missing. A few things commonly cause this:
You’re on Legacy BIOS/MBR instead of UEFI/GPT. TPM 2.0 and Secure Boot both require your system to boot in UEFI mode, with the drive partitioned as GPT rather than the older MBR format.
If your Windows installation is currently running in Legacy/CSM mode, you’ll need to convert the disk from MBR to GPT and switch your boot mode to UEFI before TPM will be recognized as available for Windows 11. This is a more involved step, and backing up your data first is strongly recommended before attempting it.
CSM (Compatibility Support Module) is still enabled. Even with UEFI available, many BIOS versions ship with CSM turned on for backward compatibility with older operating systems. Look for a CSM setting, usually near the Boot tab, and disable it.
You changed the setting but didn’t save before exiting. It sounds obvious, but exiting BIOS with “Discard Changes” instead of “Save Changes and Reset” is a very common mistake. Always confirm you’re using the save-and-exit option (commonly F10) rather than a plain restart or escape.
A pending TPM firmware update is stuck. If Windows shows a message about a TPM update being scheduled, restart and allow it to fully complete rather than interrupting it, since a partial firmware update can temporarily make the TPM appear unavailable.
When You Might Need to Clear the TPM
Clearing the TPM wipes the keys currently stored in the chip and resets it to an unowned state. You’d typically do this before a clean OS installation, when troubleshooting a TPM that’s misbehaving, or when preparing a PC to be sold or repurposed.
Before clearing TPM, back up any BitLocker recovery keys and make sure you know your account credentials. Clearing TPM on a BitLocker-encrypted drive can require the recovery key to unlock it again afterward.
You can clear TPM either from Windows Security → Device security → Security processor troubleshooting → Clear TPM, or from within the BIOS security menu itself using a “Clear TPM” checkbox alongside the enable/disable toggle.
Clearing TPM does not erase your files, programs, or Windows installation. It only affects the cryptographic keys and credentials the TPM itself manages.
Common Mistakes to Avoid
Assuming “TPM not found” means your PC can’t run Windows 11. In the large majority of cases, it just means the TPM is disabled in the BIOS, not physically absent. Always check tpm.msc and your BIOS settings before concluding you need new hardware.
Looking for a setting literally labeled “TPM.” On most consumer motherboards built in the last several years, you’ll find PTT or fTPM instead. Searching your BIOS menus for the exact word “TPM” and giving up when it’s not there is one of the most common points people get stuck.
Enabling TPM without checking UEFI/GPT status first. If your Windows install is still in Legacy/MBR mode, enabling TPM alone won’t be enough to pass Windows 11 compatibility checks.
Clearing TPM on a BitLocker-encrypted drive without the recovery key handy. This is the single most common way people accidentally lock themselves out of their own data during TPM troubleshooting.
Confusing a TPM header on the motherboard with an already-present chip. Some boards have an empty pin header labeled “TPM” for an optional add-in module. Its presence doesn’t mean TPM functionality is already available; you may still need to enable firmware TPM (fTPM/PTT) separately, or purchase and install the physical module.
Myth vs. Fact
Myth: “My PC doesn’t have TPM if BIOS doesn’t show an option called ‘TPM.'” Fact: Most modern CPUs include firmware TPM under names like Intel PTT or AMD fTPM. The functionality is there, just labeled differently.
Myth: “Enabling TPM will encrypt my drive or change my files.” Fact: Enabling TPM alone does nothing to your data. It only makes hardware-backed key storage available for features like BitLocker to use if and when you turn those on separately.
Myth: “If my PC doesn’t support TPM 2.0, there’s no way to run Windows 11.” Fact: Microsoft does allow installation on unsupported hardware through registry workarounds, though Microsoft doesn’t recommend or officially support this route, and such systems won’t receive the same guarantee of updates.
What If Your PC Doesn’t Support TPM 2.0 at All?
If you’ve confirmed through BIOS that no TPM, PTT, or fTPM option exists anywhere, your motherboard’s chipset genuinely predates TPM 2.0 support. This affects mainly systems built before roughly 2015–2016.
If your PC doesn’t have a compatible TPM, you have three practical options.
First, check whether your motherboard has a TPM header. If it does, you may be able to install a compatible discrete TPM module. Check your motherboard manual first. TPM headers aren’t standardized across manufacturers.
The second option is to upgrade your motherboard and CPU.
The third option is to install Windows 11 on unsupported hardware. However, this comes with potential limitations related to updates, compatibility, and official support.
For a full walkthrough of that last option, see our guide on installing Windows 11 on unsupported hardware.
Conclusion
TPM sounds intimidating mostly because Microsoft’s own error messages don’t explain what it actually is or how to fix it. In practice, the chip has quietly existed on most PCs built since 2016. It just needs to be switched on.
Check your status with tpm.msc, head into BIOS, find PTT or fTPM under Security or Advanced settings, enable it, and save.
For the small number of PCs where TPM genuinely isn’t supported at the hardware level, no software fix will add it. But for everyone else, this is a two-minute setting change standing between you and Windows 11.
Frequently Asked Questions
What does TPM stand for?
TPM stands for Trusted Platform Module, a hardware-based security standard that generates and stores encryption keys separately from your regular storage drive.
Do I need a physical TPM chip, or does firmware TPM count for Windows 11?
Firmware TPM (Intel PTT or AMD fTPM) counts the same as a discrete physical chip. Windows 11 doesn’t distinguish between the two as long as the specification version is 2.0.
How do I check my TPM version without opening BIOS?
Press Win + R, type tpm.msc, and press Enter. The window that opens shows your TPM’s specification version directly, without needing to restart into BIOS.
Why does my BIOS not have an option called “TPM”?
Most consumer motherboards label this setting as PTT (Intel) or fTPM (AMD) instead of “TPM” directly. Look under Security or Advanced menus for either of those terms.
Is TPM 2.0 the same as Secure Boot?
No, though Windows 11 requires both. TPM handles encryption key storage and hardware-level tamper detection, while Secure Boot verifies that the operating system loader hasn’t been tampered with during startup. They work together but are separate settings.
Can I install Windows 11 with TPM 1.2 instead of 2.0?
No, TPM 2.0 is a hard requirement for standard Windows 11 installation and updates through the normal Windows Update or Media Creation Tool path.
Will enabling TPM delete my files or require a fresh Windows install?
No. Enabling TPM in BIOS doesn’t touch your existing files, programs, or Windows installation. It only makes the hardware security functions available.
My motherboard has a TPM header but no chip installed; what do I do?
Check whether your CPU supports firmware TPM (most Intel 8th-gen and AMD Ryzen chips or later do) and enable PTT/fTPM in BIOS instead of buying a physical module. It’s functionally equivalent for Windows 11 purposes and free.
What happens if I clear my TPM by accident?
Your files and programs remain intact, but any BitLocker-encrypted drives will require your recovery key to unlock again, and Windows Hello credentials tied to the old TPM state will need to be set up again.
Does clearing TPM fix “TPM not detected” errors?
Sometimes, if TPM appears present but is misbehaving or Windows reports inconsistent status, clearing and re-initializing it from Windows Security can resolve the conflict. It won’t help if TPM is simply disabled in BIOS or genuinely unsupported.
Can I upgrade a discrete TPM 1.2 chip to TPM 2.0?
Generally no. Most TPM 1.2 chips can’t be upgraded via software since the specification is built into the hardware itself. A BIOS/firmware update sometimes resolves this on systems using firmware TPM instead.
How do I know if my PC uses discrete TPM or firmware TPM?
Check tpm.msc for the manufacturer name. Entries like “Intel” or “AMD” typically indicate firmware TPM, while a separate chip manufacturer name (such as Infineon or Nuvoton) usually indicates a discrete TPM chip.
Is it safe to enable TPM on an older gaming PC?
Yes. Enabling TPM carries essentially no risk to an already-installed operating system and doesn’t alter your existing data. It only becomes relevant once you enable a TPM-dependent feature like BitLocker.
Why does Windows 11 require TPM but Windows 10 didn’t?
Microsoft raised the baseline security requirements for Windows 11 specifically to counter firmware- and bootloader-level malware, using TPM 2.0 alongside Secure Boot as the enforcement mechanism across the entire Windows 11 install base rather than as an optional feature.
Does TPM 2.0 slow down my PC?
No measurable performance impact exists for typical use. TPM operations happen in dedicated hardware or a small firmware routine and don’t compete with your CPU or storage for everyday tasks.
Can I run Windows 11 without TPM 2.0 at all?
Yes, through unsupported-hardware installation methods, though Microsoft doesn’t guarantee updates or support for systems installed this way, and it’s worth weighing the risk before going that route on a primary PC.
What’s the difference between Intel PTT and Intel TXT?
PTT (Platform Trust Technology) is Intel’s firmware TPM implementation used for the Windows 11 requirement; TXT (Trusted Execution Technology) is a separate, more advanced hardware security feature aimed mainly at enterprise environments and isn’t required for Windows 11.
We hope you found this post useful, and please like and follow us on Facebook and Twitter for regular updates.
We also request that you bookmark this page for future use. Sign up for our free newsletter as well to receive new information in your inbox regularly and stay technically up to date.
Disclosure: If you follow our links to a retailer’s website and make a purchase, we will get an affiliate commission on some, but not all, of the items or services we promote. This will cause no price change for you.