

How to Transfer Files Over Remote Desktop in Windows: 5 Easy Methods
If you’ve ever connected to a remote PC and then wondered how to actually get a file from your computer onto it (or vice versa), you’re not alone.
Remote Desktop Connection doesn’t make this obvious. There’s no drag-and-drop icon staring you in the face, and one wrong clipboard setting will make it look like file transfer simply doesn’t work.
The good news: it does work, and once you know where the settings live, it takes under a minute to set up.
Quick answer: The fastest way to transfer files over Remote Desktop is to enable Clipboard and Drive redirection under Show Options → Local Resources before you connect. Once connected, you can copy-paste or drag-and-drop files between your PC and the remote session, or browse your local drives from inside the remote session via This PC → Redirected Drives.
Below, I’ll walk through five methods, from the built-in RDP tricks to third-party tools for Windows Home users, plus the fixes for the errors people run into most often.
Before You Start: What You Need
- Remote Desktop Connection (RDP) works out of the box only if the remote PC is running Windows 10/11 Pro, Enterprise, or Education. Windows Home can’t host an incoming RDP connection (more on the workaround below).
- You’ll need the remote PC’s IP address or hostname and a username/password with access to it.
- Both machines should be on the same network, or connected through a VPN/port-forwarding setup if you’re connecting over the internet.
- A stable connection matters more than people expect. If your Wi-Fi keeps dropping mid-transfer, it’s worth confirming your network doesn’t have IP configuration issues before you start moving large files.
Method 1: Copy and Paste (Fastest for a Few Files)
This is the method most people actually want. Here, there is no drive mapping, no third-party software, just Ctrl+C and Ctrl+V between your local machine and the remote session.
- Open Remote Desktop Connection (press
Windows + R, typemstsc, hit Enter). - Click Show Options in the bottom-left corner.
- Go to the Local Resources tab and make sure Clipboard is checked.
- Connect to the remote PC as usual and sign in.
- On the source computer (local or remote), select the file, right-click, and choose Copy (or press.
Ctrl + C). - Switch to the destination computer’s window, right-click where you want the file, and choose Paste (or
Ctrl + V).
Good for: a handful of documents, images, or small files you need right now.
Watch out for: Microsoft’s clipboard redirection silently fails on any single file larger than 2 GB. The copy will appear to do nothing, and you won’t get an error message. If that happens, switch to drive redirection (Method 3) instead.
Method 2: Drag and Drop
If Clipboard redirection is already enabled, you can also drag files directly between the local desktop and the remote session window, the same way you’d drag a file between two folders.
- Confirm Clipboard is enabled under Show Options → Local Resources (same as Method 1).
- Arrange your local File Explorer window and the Remote Desktop window so both are visible, side by side works best.
- Click and hold the file in one window, drag it across, and release it in the destination window.
This works well for one or two files, but gets clunky fast with dozens of files or nested folders. For bulk transfers, drive redirection is more reliable.
Method 3: Drive Redirection (Best for Bulk Transfers)
Drive redirection mounts your local drives inside the remote session, so you can browse and copy files exactly like you would locally. It’s the most robust of the built-in methods and the only one that handles files over 2 GB without issue.
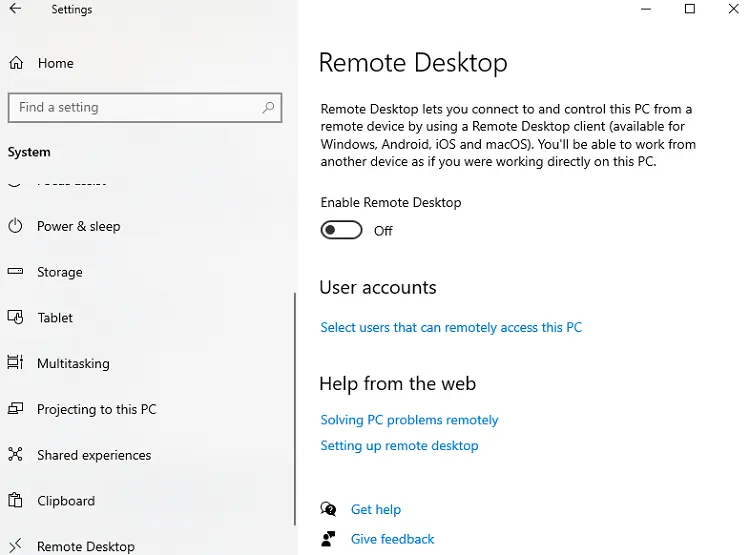
Step 1: Enable Remote Desktop on the host PC
- Right-click the Start button and choose Settings.
- Click System.
- Select Remote Desktop from the left pane.
- Turn on the Remote Desktop toggle and click Confirm.
Step 2: Find the remote PC’s IP address
On the remote computer:
- Open Settings → Network & Internet.
- Click Wi-Fi or Ethernet, then click your active connection.
- Note the IPv4 address and the username of that PC; you’ll need both.
Step 3: Connect and share your local drives
- Search for Remote Desktop Connection in the Start menu and open it (running as administrator avoids some permission issues).
- Click Show Options → Local Resources → More.
- Expand the categories and check the boxes for the drives or folders you want available during the session.
- Click OK, then go to the General tab and enter the remote PC’s username and IP address.
- Click Connect, confirm the prompt, and enter the remote PC’s password.
Step 4: Access your files from inside the session
- On the remote desktop, open File Explorer.
- Click This PC.
- Your shared drives will appear under Redirected Drives and Folders.
- Copy and paste files between the redirected drive and the remote PC’s local storage as needed.
Transfer speed depends on both machines’ specs and your internet or LAN speed, so expect it to run a bit slower than a local copy-paste. That’s normal, not a sign that anything is broken.
If you’re regularly moving large files or working with limited local storage, keeping a fast external SSD like the Samsung T7 portable SSD (view on Amazon) on hand makes it easy to stage files locally before an RDP session instead of waiting on a slow redirected-drive transfer.
Related: Is Your Hard Drive Clicking? Here’s What You Need to Know
Method 4: FTP or SFTP (Best When Drive Sharing Is Blocked)
Some networks, especially corporate ones, disable the clipboard and drive redirection entirely for security reasons. If that’s the case for you, FTP (File Transfer Protocol) or SFTP (Secure FTP) works independently of Remote Desktop’s built-in features.
- Install an FTP or SFTP server on the remote system (Windows includes a built-in SFTP-compatible option via OpenSSH Server, which you can add under Settings → Apps → Optional Features).
- On your local machine, connect using an SFTP client. Windows’ File Explorer supports basic SFTP connections, or you can use a dedicated client for more control.
- Enter the remote PC’s IP address and credentials to connect.
- Drag and drop files between the local and remote file panes, just like a normal file manager.
Good for: networks where RDP drive/clipboard redirection is locked down by policy, or when you need a persistent, always-on way to move files that doesn’t depend on keeping an RDP session open.
Trade-off: standard FTP sends data unencrypted, so stick to SFTP unless you’re on a fully trusted, isolated network.
Method 5: Third-Party Remote Desktop Tools (Best for Windows Home)
If the remote PC runs Windows 10 or 11 Home, it can’t accept incoming RDP connections at all. Microsoft reserves that feature for Pro, Enterprise, and Education.
Third-party remote access tools fill that gap, and most include a dedicated file-transfer panel that’s more visual than dragging files through an RDP window.
AnyViewer is one option built specifically around this use case:
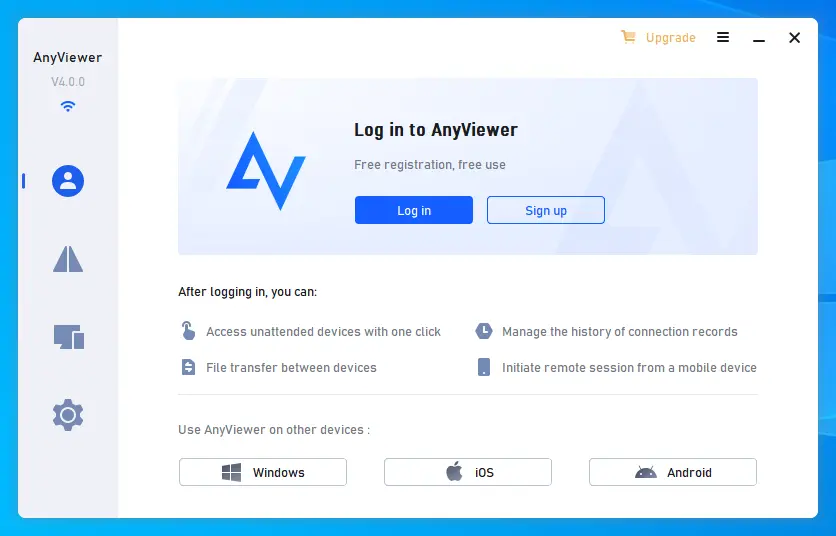
- Download and install AnyViewer on both the local and remote computers.
- Sign up for a free account and log in on the local PC.
- Log in to the same account on the remote PC. This links both devices automatically.
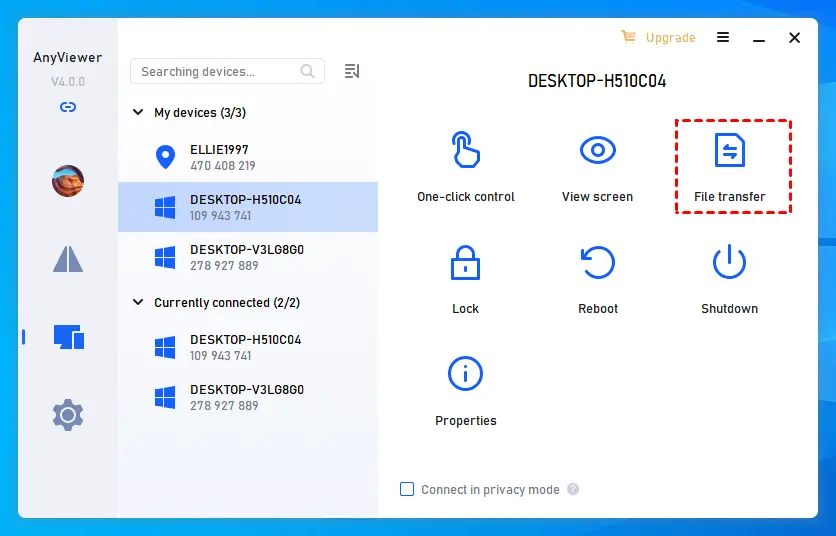
- On the local PC, open the Device tab, select the remote computer, and click File Transfer.
- In the File Transfer window, select your files and use the arrow buttons to move them in either direction.
Free accounts are typically capped on transfer speed and thread count; paid tiers raise those limits along with the maximum file size per transfer.
Other tools in this category worth knowing about, useful if AnyViewer’s account-based model isn’t for you, include lightweight, link-based remote access apps that skip account creation entirely and connect through a one-time session link instead.
Good for: Windows Home users, anyone supporting non-technical family members remotely, or situations where you want a visual file browser instead of drive redirection.
Related: How to Block Specific Devices from Your WiFi Router
Comparison: Which Method Should You Use?
| Method | Best For | Works on Windows Home | File Size Limit | Setup Effort |
|---|---|---|---|---|
| Copy-Paste | A few small files, quick sends | No | ~2 GB per file | None (if clipboard enabled) |
| Drag-and-Drop | 1–2 files, visual transfer | No | ~2 GB per file | None (if clipboard enabled) |
| Drive Redirection | Bulk transfers, large files | No | No practical limit | Low |
| FTP/SFTP | Locked-down networks, persistent access | Yes (with a server set up) | No practical limit | Medium |
| Third-Party Tools | Windows Home, non-technical users | Yes | Varies by tool/tier | Low |
Common Mistakes to Avoid
- Forgetting to enable the Clipboard before connecting. It has to be turned on before you connect. Toggling it mid-session won’t retroactively fix a stalled transfer.
- Trying to copy a file over 2 GB with clipboard redirection. It fails silently with no error message. Use drive redirection instead.
- Assuming Windows Home can host RDP sessions. It can only initiate outgoing connections, not accept incoming ones. You need Pro/Enterprise on the host side, or a third-party tool.
- Not checking drive redirection separately from the clipboard. They’re two different checkboxes. Clipboard alone only moves plain text and small files. Full drive browsing needs drive redirection enabled, too.
- Ignoring firewall or antivirus prompts the first time you connect, which can silently block redirected drives from appearing.
Troubleshooting: Fixing Common RDP File Transfer Problems
Copy-paste isn’t working at all
- Confirm Clipboard is checked under Show Options → Local Resources on the client.
- On the remote machine, open Task Manager, end the rdpclip.exe process, then relaunch it (Run →
rdpclip.exe). This resets a stalled clipboard channel without ending your session. - If it still fails, log off the remote session completely and reconnect. This clears most clipboard sync issues.
Redirected drives aren’t showing up under “This PC”
- Double-check that you selected the correct drives under Local Resources → More before connecting. This setting doesn’t apply retroactively to an active session.
- On managed or work networks, drive redirection may be disabled by Group Policy. Check with your IT administrator if you don’t see the option at all.
A large file transfer fails with no error message
- This is almost always the 2 GB clipboard-redirection limit. Switch to drive redirection, which has no such cap.
File transfer works, but is extremely slow
- Transfer speed is bound by the slower of your two internet/LAN connections. If both machines are on solid connections but speeds are still poor, check your Wi-Fi channel settings. Channel congestion is a common, overlooked cause of sluggish remote sessions.
Expert Tips for Smoother Remote File Transfers
- Enable only the drives you need. Sharing your entire C: drive when you only need one folder slows down the session’s initial handshake and clutters the redirected-drives list.
- Use a wired connection on at least one end if you’re transferring large batches of files. Wi-Fi instability is the most common cause of stalled or corrupted transfers.
- Run Remote Desktop Connection as administrator on the local machine if you notice drive redirection permissions behaving inconsistently.
- Compress folders before transferring if you’re moving many small files. A single zipped archive transfers noticeably faster than thousands of individual files over RDP.
If your remote sessions regularly involve large file batches, a reliable Ethernet cable like the Jadaol Cat 6 Ethernet Cable on Amazon for the host machine can meaningfully cut transfer times compared to relying on Wi-Fi alone.
Myth vs. Fact
| Myth | Fact |
|---|---|
| “RDP can’t transfer files at all.” | It can, through clipboard, drag-and-drop, or drive redirection. It’s just not turned on by default. |
| “Any file size works fine over copy-paste.” | Files over 2 GB fail silently with clipboard redirection; use drive redirection instead. |
| “Windows Home can do everything Pro can for RDP.” | Windows Home can connect out to another PC but can’t host incoming RDP connections. |
| “Third-party tools are less secure than RDP.” | Reputable tools use end-to-end encryption; the real risk is picking an unverified or unmaintained app. |
Security Considerations
Remote Desktop is generally considered safer than routing sensitive files through cloud storage, since the data moves directly between the two machines rather than sitting on a third-party server. That said, a few habits matter:
- Only enable RDP access when you need it, and turn it off afterward if the PC is on a shared or public network.
- Use a strong, unique password on any account with RDP access. This is the single most common way RDP sessions get compromised.
- If you’re connecting over the internet rather than a local network, use a VPN rather than exposing port 3389 directly.
Related: Is Guest WiFi Safe? How to Create a Secure Guest Network
Conclusion
Moving files over Remote Desktop isn’t complicated once you know the two settings that actually matter: Clipboard and Drive redirection, both tucked under Show Options → Local Resources.
For quick, small transfers, copy-paste or drag-and-drop gets the job done in seconds. For bulk transfers or files over 2 GB, drive redirection is the more reliable choice.
And if the remote PC runs Windows Home, a third-party tool like AnyViewer, or an SFTP setup if you want something account-free, closes that gap entirely.
Whichever method fits your situation, the setup takes a couple of minutes and saves you from routing sensitive files through cloud storage just to get them from one PC to another.
Frequently Asked Questions
How do I transfer files using Remote Desktop in Windows?
Enable Clipboard and Drive redirection under Show Options → Local Resources before connecting, then either copy-paste files directly or browse your local drives from This PC → Redirected Drives inside the session.
Why can’t I copy and paste files in Remote Desktop?
The most common cause is the clipboard not being enabled before you connected. Restarting the rdpclip.exe process or reconnecting the session also fixes most cases.
What is the file size limit for Remote Desktop file transfer?
Clipboard redirection (copy-paste and drag-and-drop) silently fails on files over 2 GB. Drive redirection has no practical file size limit.
Can I use Remote Desktop file transfer on Windows Home?
Windows Home can initiate an outgoing RDP connection but can’t accept incoming ones, so you can’t use it to host a session that others can connect to. A third-party remote access tool is the workaround.
Why are my redirected drives not showing up on the remote PC?
You likely didn’t select the drives under Local Resources → More before connecting, or drive redirection has been disabled by network policy on the remote machine.
Is Remote Desktop file transfer secure?
Yes, when used over a trusted network or VPN with a strong password. Avoid exposing RDP directly to the open internet without additional protection.
How do I enable drive redirection in Remote Desktop Connection?
Open Remote Desktop Connection, click Show Options, go to Local Resources, click More, and check the drives you want available during the session.
Does Remote Desktop file transfer work over the internet, not just a local network?
Yes, as long as you have the correct public IP or hostname and the necessary port forwarding or VPN configured, though a VPN is strongly recommended for security.
Why is my Remote Desktop file transfer so slow?
Transfer speed is limited by the weaker of the two connections involved, plus each PC’s hardware. Wired connections and enabling only the necessary drives usually help.
What’s the difference between clipboard redirection and drive redirection?
Clipboard redirection lets you copy-paste individual files (up to 2 GB); drive redirection mounts entire local drives inside the session for unrestricted file browsing and larger transfers.
Can I drag and drop files between my PC and a Remote Desktop session?
Yes, once Clipboard is enabled, you can drag files between the local desktop and the remote session window just like moving files between two folders.
What should I do if a large file transfer fails with no error message?
This is typically the 2 GB clipboard-redirection ceiling. Switch to drive redirection, which handles large files without issue.
Do I need to install anything extra to use Remote Desktop file transfer?
No. Remote Desktop Connection is built into Windows Pro, Enterprise, and Education. Windows Home users need a third-party tool instead.
Can I transfer files between a Windows PC and a Mac using Remote Desktop?
Yes, using the Microsoft Remote Desktop app for macOS, which supports folder redirection through its connection settings, similar to the Windows client.
Is FTP or SFTP better than RDP drive redirection for file transfer?
SFTP is a better choice when drive/clipboard redirection is blocked by network policy or when you want a persistent transfer method that doesn’t require an open RDP session. For everyday use, drive redirection is simpler to set up.
Why does my company’s Remote Desktop not allow file transfer?
Many organizations disable the clipboard and drive redirection through Group Policy for security compliance. Contact your IT administrator if you need an exception.
Can I transfer an entire folder, not just individual files, over Remote Desktop?
Yes. Both clipboard-based copy-paste and drive redirection support folders, though drive redirection handles large folders more reliably.
What Windows versions support built-in Remote Desktop hosting?
Windows 10/11 Pro, Enterprise, and Education can host incoming RDP connections. Windows 10/11 Home cannot.
Please share this article with your friends and relatives if you find it useful.
We also ask that you bookmark this page for future reference, as we are constantly updating our articles with new information.
Sign up for our free newsletter as well to receive fresh information immediately in your inbox and keep technically up to date.
Disclosure: If you follow our links to a retailer’s website and make a purchase, we will get an affiliate commission on some, but not all, of the items or services we promote. This will cause no price change for you.



This is a great tutorial! I’m new to remote desktop and this was very helpful.